Thanks for the input , mushrooming makes sense. Being generous with epoxi should do the trick. I got these just in case anticipating few issues.
Those that have run of epoxi, what has been a good substitute available at HD and such, if any.
MaxJax quoted 50$ for an extra tube of expoxi, which seems quite ridiculous if you ask me.
I'm assuming you're using Inject-TITE AWF epoxy with Power-Sert Anchors...otherwise you're on your own. Maxjax has similar procedure notes in their epoxy grip kit. Their kit is a good value instead of buying anchors, epoxy and nozzles separately:
http://www.maxjaxusa.com/buy-purchase-maxjax-car-lift/epoxy-grip-anchor-bolt-kit.html
BUt if you just need another tube of epoxy:
http://fasteners.stanleysupplyonline.com/viewitems/hors-accessories-inject-tite-formula-epoxy-anchors/-epoxy-anchors-inject-tite-awf-all-weather-formula
You can get the 9 oz tube for considerably less and it fits a normal caulk gun. The larger size, 28 oz, requires a specialized 10:1 dispenser that costs at least $70. Make sure you get the proper mixing nozzles - you'll need several:
http://fasteners.stanleysupplyonline.com/item/-adhesive-anchors-accessories-adhesive-accessories/ries-adhesive-accessories-break-off-mixing-nozzles/enz38?.
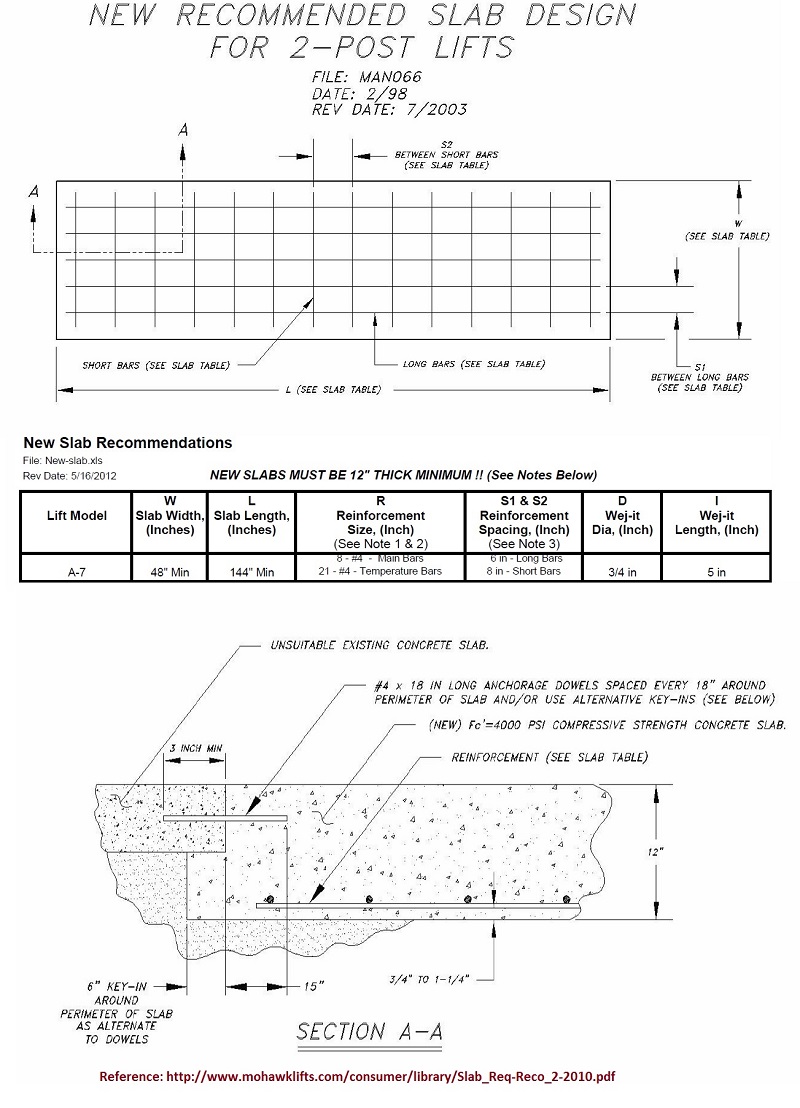
I also drilled through my slab (even though 6" thick) and used a foam disc approx 1-1.25" diameter to act as a dam and prevent drainage of the epoxy - (it's pretty watery before it sets up).
Basic procedure (my procedure):
1) Drill hole, wirebrush hole walls by hand (use wire bristle brush - toothbrush type is best unless you can get a wire bottle brush). Vacuum hole, brush again, then use a slender nozzle at the very bottom and blow out with compressed air (COVER YOUR EYES!) - you'll not believe how much dust still comes out even after vacuuming. Repeat brush and air blow two more times. Repeat for all the other holes. If your hole is wet, you cannot epoxy until it is dry - make sure any water under the slab and affecting your holes is removed before starting any cleaning.
2) Test fit each anchor in each hole to installation depth - use a bolt screwed into the anchor to allow extraction (use a prybar as a lever on the bolt head and something to protect your floor). It should be a tight fit -not a drop-in - there should be some friction when inserting. Make sure you can insert it fully - use a mallet if necessary. Remember that if you can't get it in now, it'll never go in with epoxy later.
3) If a hole is too tight even after using a mallet, lightly run the masonry drill (I used a Bosch SDS Plus bit) in the hole to increase its diameter, check and repeat if necessary, Re-clean the hole.
4) After loading up the caulk gun and nozzle and expelling the epoxy so it has a consistent gray color (check the nozzle to see how the mix goes), insert the foam disc into the hole - push it to the bottom with the anchor then remove anchor. Fill the hole halfway with epoxy. Thread bolt into anchor and insert into hole with a twisting motion to installation depth. If epoxy oozes up (and you should get some around the circumference of the anchor), the bolt will keep the anchor threads free of epoxy. Once anchor is to depth, wipe epoxy from top of anchor, remove bolt.
5) Repeat for remaining holes.
6) Let cure - it says a few hours for complete cure depending on temperature.
7) Test. Once fully cured, you need to test the anchors. I set up like so and tested it with a torque wrench to 100 lb-ft.
8) If a failure, then wrench the anchor out. Use your drill to drill out the remaining epoxy and repeat procedure above.


 , I thought I would put in my .02 and hopefully help out the next guy.
 ) and would recommend that folks purchasing the lift opt for the epoxy version. I wish that Danmar would give the option of selecting the epoxy anchors in lout of the friction set. I also found that you will need an additional tube of the epoxy if you plan to go that route.