To avoid these ads, REGISTER NOW!

Maxjax Installs: Post Here

lemmy999

Well-known member
Joined
Jun 25, 2019
Messages
86
Location
TN
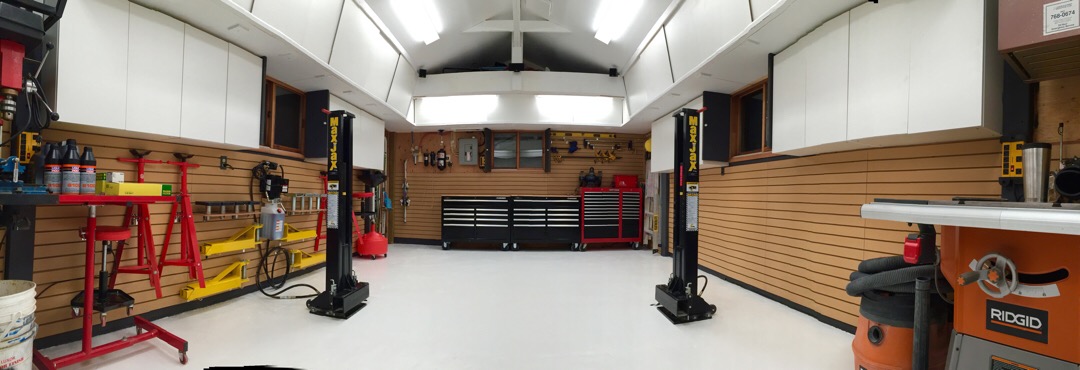
I have been looking in to get t a MaxJax lift. I have watched lots of videos and read quite a few posts on here regarding the concrete. I have seen some people dig up and pour a new slab, but a majority seem to make sure their slab is at least 4" and then drill away. Of course Danmar says 3000psi concrete is required with steel reinforcement. I would assume a large percentage of people have no idea what was used on their garage floor and I have read the minimum is 2500 psi so I am sure that is what most contractors use. So are people just assuming it is 3000 psi concrete or are they having some sort of test performed?

As far as steel reinforcement, I have a Zircon MT6 metal scanner and it finds metal in my floor and say it is about 3-4" deep, but sometimes it says it is ferrous metal and in other places it says it is non ferrous. So outside of the thickness being ok, I'm not really sure what my floor is.
 
To avoid these ads, REGISTER NOW!

escapesno

Member
Joined
Mar 18, 2017
Messages
8
Location
Aurora Colorado
I ended up pouring a 14' x 4' by 12 inches deep 5000 psi reinforced pad the was pinned and keyed into the original floor. My original floor was "4 inches" thick when I first installed the lift. During the first lift the post closest to the wall (8 inches away) gave way when I was about 2 feet up. Luckily it didn't lean all the way to the car so no damage done except the busted floor. My point here is you can have 4 inches of concrete but that doesn't mean it will hold. Some people have just done two 4 x 4 xpads but I figure if I'm putting my life under the car I am going with overkill. I had a contractor do the whole job for $900, for 2 pads it was $700. For $200 more I think it was worth it. I keep 2 levels on each post and they don't move at all. BTW use the epoxy anchors they work great and if properly installed they will not loosen or fail. As far as the lift goes cant beat it. I have a nine ft ceiling and have plenty of clearance short chair. Most garage floors are not reinforced so your scanner my be picking up construction debris.
 

lemmy999

Well-known member
Joined
Jun 25, 2019
Messages
86
Location
TN
I ended up pouring a 14' x 4' by 12 inches deep 5000 psi reinforced pad the was pinned and keyed into the original floor. My original floor was "4 inches" thick when I first installed the lift. During the first lift the post closest to the wall (8 inches away) gave way when I was about 2 feet up. Luckily it didn't lean all the way to the car so no damage done except the busted floor. My point here is you can have 4 inches of concrete but that doesn't mean it will hold. Some people have just done two 4 x 4 xpads but I figure if I'm putting my life under the car I am going with overkill. I had a contractor do the whole job for $900, for 2 pads it was $700. For $200 more I think it was worth it. I keep 2 levels on each post and they don't move at all. BTW use the epoxy anchors they work great and if properly installed they will not loosen or fail. As far as the lift goes cant beat it. I have a nine ft ceiling and have plenty of clearance short chair. Most garage floors are not reinforced so your scanner my be picking up construction debris.

So did the contractor cut the concrete out, dig down 12 inches, add the rebar, pour and finish the concrete out for $900? That is a pretty great deal. I've expected to pay $500 even if I cut, excavate and add the rebar myself. Did you hire a general contractor or just call a concrete company and they handled it all?

What kind of anchors did you use initially on the 4" floor? Did you use the epoxy or expansion anchors?
 

escapesno

Member
Joined
Mar 18, 2017
Messages
8
Location
Aurora Colorado
I hired a company the does all types of concrete work. They cut, dug, placed rebar and concrete, finished slab, hauled away debris and even made sure that where the lift is mounted is level since there is slope in the garage. I used epoxy anchors in the 4 inch concrete and ordered new ones after I installed the new pad.
 

lemmy999

Well-known member
Joined
Jun 25, 2019
Messages
86
Location
TN
I hired a company the does all types of concrete work. They cut, dug, placed rebar and concrete, finished slab, hauled away debris and even made sure that where the lift is mounted is level since there is slope in the garage. I used epoxy anchors in the 4 inch concrete and ordered new ones after I installed the new pad.


That is an outstanding price. If I could find a reputable company to do that for that price I would go that direction.

Did you ever figure out why your 4" concrete failed? It is a bit unnerving that 4" is listed as the minimum required so lots of people are installing with 4" concrete. If yours failed I'm assuming there are many installations that do not have much safety margin.
 

NewShockerGuy

Well-known member
Joined
Oct 12, 2010
Messages
2,481
Location
Northern Virginia / DC
Does anyone have alternatives for the 6" extensions and or the frame adapters?

6" Extension:
https://www.maxjaxusa.com/6-height-extension-for-max-jax.html
$34 each

Frame Adapter:
https://www.maxjaxusa.com/frame-cradle-pads.html
$45 each.

I ask only because I'm about to buy them at $316 which seems really steep, especially for the extensions. If I knew someone that could mill it probably wouldn't be hard to make. The machine shops by me charge something like $130 an hour so having them
make them wouldn't be cost efficient.

OR does anyone have a coupon code to use on MaxJaxUSA.com..lol

Thanks,
-Nigel
 

Tres84

Member
Joined
Nov 22, 2016
Messages
9
Has anyone had issues lining up the arm restraints? 3 out of the 4 fit fine after being adjusted. 1 of the restraints does not want to line up. It seems like I could make it line up if I enlarged the holes in the toothed restraint on the arm side. Has anyone else had problems?
 

Attachments

  • IMG_3672.jpg
    IMG_3672.jpg
    88.4 KB · Views: 123

curiousB

Well-known member
Joined
Dec 15, 2011
Messages
143
Location
NW Chicago, IL
I had troubles too but the realignment procedure seemed to do the trick. I think they should have used fewer, courser teeth with a tapered lead in so it would self align.... but that won't change now. I guess they didn't want the arms to rotate much as you engaged the teeth (hence the finer pitch).
 

Tres84

Member
Joined
Nov 22, 2016
Messages
9
I had troubles too but the realignment procedure seemed to do the trick. I think they should have used fewer, courser teeth with a tapered lead in so it would self align.... but that won't change now. I guess they didn't want the arms to rotate much as you engaged the teeth (hence the finer pitch).

The other three aligned perfectly after the realignment procedure. This one needs constant realignment. I contacted Dannmar and they are sending new pieces.
 

Jagmandave

Well-known member
Joined
Nov 6, 2011
Messages
6,299
Location
Overland Park, Ks.
A buddy bought one of the new MaxJax - the ones with the automatic locks and 7 positions instead of the original 2 positions held by a pin. We got it all installed, leveled and plumb and it goes up great but won't come back down unless you use a crowbar and rock the lift arm so that it unbinds. Danmar says it's due to the texture of the coating they use on the insides of the uprights, and say to just go in and sand it off......a major job for someone who doesn't have angle grinders or wire wheels and such.

Anyone else having this issue?

I thought if we lubed the slides up well and put the heaviest car he owns on the lift (about 3K lbs) and ran it up and down enough times it would eventually free up. It has gotten better but still sticks on one side now and again, and if you're not paying really close attention, when it does release and drops couple inches it's pretty scary! He normally uses it to lift a classic Mini which only weighs less than 1500lbs
 

ezover

Well-known member
Joined
Jan 15, 2008
Messages
2,412
Location
3rd rock from the sun
A buddy bought one of the new MaxJax - the ones with the automatic locks and 7 positions instead of the original 2 positions held by a pin. We got it all installed, leveled and plumb and it goes up great but won't come back down unless you use a crowbar and rock the lift arm so that it unbinds. Danmar says it's due to the texture of the coating they use on the insides of the uprights, and say to just go in and sand it off......a major job for someone who doesn't have angle grinders or wire wheels and such.

Anyone else having this issue?

I thought if we lubed the slides up well and put the heaviest car he owns on the lift (about 3K lbs) and ran it up and down enough times it would eventually free up. It has gotten better but still sticks on one side now and again, and if you're not paying really close attention, when it does release and drops couple inches it's pretty scary! He normally uses it to lift a classic Mini which only weighs less
than 1500lbs

Someone else had a thread about this problem and they said they sanded the inside and it cured the binding issue. Thread was maybe 3 months back.
 

gandyj

Well-known member
Joined
Jan 4, 2010
Messages
56
Location
Tallahassee, Fl.
I recently installed my M-6 and had one side stick on the way down. I found the problem to be the lock release handle. As the lift comes down the locking blocks ( I think that's what you call them) inside the post contact the top of the lock release handle causing the spring loaded lock to move outward so the locking blocks can go past. In my case I found the top of the release handle to be very rough and came to a sharp point. I smoothed the top and rounded the front edge of the handle to fix the issue.
 

svassh

New member
Joined
Dec 2, 2019
Messages
3
Location
Highland Village, TX
Hi Guys

My M6 Lift is on order so I am of course reading this thread diligently. Went with the M6 over Standard as it came with free shipping, tailgate and 3 year warranty for a couple hundred more. Couple questions or maybe these are posted in a FAQ somewhere I have missed.

1. Can I use epoxy with the standard anchors or do I need to use the special anchors that come with epoxy?

2. If I can use the standard anchors what is a good epoxy recommendation?

3. I have read some comments regarding type/grade of ATF fluid, are there any proven recommendations?

Thanks All :thumbup:
 

rbrtmchl

Active member
Joined
Apr 11, 2010
Messages
32
Hi Guys

My M6 Lift is on order so I am of course reading this thread diligently. Went with the M6 over Standard as it came with free shipping, tailgate and 3 year warranty for a couple hundred more. Couple questions or maybe these are posted in a FAQ somewhere I have missed.

1. Can I use epoxy with the standard anchors or do I need to use the special anchors that come with epoxy?

2. If I can use the standard anchors what is a good epoxy recommendation?

3. I have read some comments regarding type/grade of ATF fluid, are there any proven recommendations?

Thanks All :thumbup:

1) No - you should use the special anchors with the epoxy supplied when you purchase the special anchors.

2) N/A

3) I used hydraulic fluid based on the recommendation from this thread. UPSHIFT was Gabe, the Danmar representative at that time. There are other threads in GJ on this topic. ATF also works.

https://www.garagejournal.com/forum/showthread.php?t=120104&highlight=maxjax+fluid
 

svassh

New member
Joined
Dec 2, 2019
Messages
3
Location
Highland Village, TX
1) No - you should use the special anchors with the epoxy supplied when you purchase the special anchors.

2) N/A

3) I used hydraulic fluid based on the recommendation from this thread. UPSHIFT was Gabe, the Danmar representative at that time. There are other threads in GJ on this topic. ATF also works.

Thanks, I ordered a set of the epoxy anchors from Garage Appeal for $159 was having a hard time swallowing the $229 price direct from MaxJax.
 

gtr1999

Well-known member
Joined
Jun 25, 2012
Messages
151
Location
CT
Just following up on this last install- did you get the jack assembled and have any of the issues the previous guys had?
 

svassh

New member
Joined
Dec 2, 2019
Messages
3
Location
Highland Village, TX
Just following up on this last install- did you get the jack assembled and have any of the issues the previous guys had?

I actually ended up cancelling it. The supplier could not ship before mid January and I got to thinking... I have 10 foot ceilings and a 3 car garage, double deep 2 car on one side. No sooner got my refund when a local warehouse for National Auto Tools posted a 4 post Triumph NSS-8 on a great scratch and dent sale I could not pass up. It is literally being installed in my garage while I type. Even with the delivery and install of the 4 post I am $100 less than the MaxJax M6.
 

rtz

Well-known member
Joined
May 27, 2018
Messages
342
Location
Oklahoma City
Given the choice between using AW32 or Dexton III or VI; is one ideal or are they all equal?


Also; on the 7 position one; how is the safety latch on the other post held open so the lift can be lowered?

A Standard tract house that was build in 1975; what PSI concrete was common back then and typically how thick did they pour the garage floors?
 
To avoid these ads, REGISTER NOW!

Dudebrowtf

Member
Joined
Mar 28, 2017
Messages
8
Has anybody taken the risk of drilling out different height holes in their MaxJax using a mag drill? It would definitely void the warranty and maybe safety standards so probably not a good idea even if it was safe.
 

tjc1965

Member
Joined
Jan 15, 2011
Messages
18
Has anybody taken the risk of drilling out different height holes in their MaxJax using a mag drill? It would definitely void the warranty and maybe safety standards so probably not a good idea even if it was safe.

I've had mine installed about 3 years now, I have not found a need to have any additional heights than the two it comes with.

Tom C.
 

TMXONR

Member
Joined
May 1, 2015
Messages
7
This forum and this thread were helpful when buying and upgrading my MaxJax lift. I have put together a video of the upgrades and modifications that I have done to improve the use of the lift.

The video covers garage door opener relocation, hydraulic quick connects, wall mounted pump, and making lift extensions.


<iframe width="560" height="315" src="https://www.youtube.com/embed/1jRFG8lXK30" frameborder="0" allow="accelerometer; autoplay; encrypted-media; gyroscope; picture-in-picture" allowfullscreen></iframe>
 

shortykorte

Well-known member
Joined
Sep 1, 2014
Messages
8,034
Location
Tallahassee, Fl
So you used SS hardline and factory hose to both posts? Do you have pictures of the joint between the two?


Sent from my iPhone using Garage Journal
 

wake74

Well-known member
Joined
Nov 14, 2015
Messages
372
Location
NC
Agreed with above. More details please on the hard pipe, what it cost, what did you bend it with etc. the most annoying thing with my MaxJax is the lines on the floor.


Sent from my iPhone using Tapatalk
 

TMXONR

Member
Joined
May 1, 2015
Messages
7
So you used SS hardline and factory hose to both posts? Do you have pictures of the joint between the two?


Sent from my iPhone using Garage Journal

That is correct, I am running hard line from the pump, up to the factory hoses. I attached a picture of the joint and the part numbers ordered. It is just a female connector that mates to the male end of the factory hoses. The other end of the connector has threads that the 3/8 nuts and sleeve Thread to and compress against.


Agreed with above. More details please on the hard pipe, what it cost, what did you bend it with etc. the most annoying thing with my MaxJax is the lines on the floor.

The hard line is 3/8x.065 seamless tubing. It was $2.70/ft. I used about 30 feet but ordered extra. I bent it with a tool for bending fuel/brake lines. This stuff is a lot harder than brake lines so don’t be surprised if your bender gets tweaked a little. I had to clamp one handle of the bender in a vice to be able to make the bend. I believe all of the fittings that I used were 37 degree flare And for that I used a TGR flaring tool. The TGR flaring tool is the same as the Eastwood Professional Flaring Tool. This flaring tool was worth every penny! My friends and I have used it to flare all of the lines for 3 cars and have never had a leak.

The cost for parts was just under $200, plus tax. If you have a local hydraulics shop, Just tell them the size of the pump fitting and the hose fitting, then they can help you with all of the components to fit in the middle.
 

Attachments

  • DB6EDABB-F11B-46FE-B2F7-4F022CD5E059.jpg
    DB6EDABB-F11B-46FE-B2F7-4F022CD5E059.jpg
    92.1 KB · Views: 109
  • 1119CD4C-E518-499A-A729-3925CCA4DC94.jpg
    1119CD4C-E518-499A-A729-3925CCA4DC94.jpg
    110.9 KB · Views: 99

Mr onetwo

Well-known member
Joined
Apr 6, 2011
Messages
2,002
Location
Coastal Maine
Now that is a proper job done on the hard lines!:thumbup: Also, great idea on the pins if you don't have a buddy with a machine shop like I do.:bounce:
 
Last edited:

Radman

Member
Joined
Feb 3, 2021
Messages
21
Location
Florida
Old thread, but still relevant. Tons of great info. My MaxJax M6K gets delivered today! I read through the entire thread while it was being shipped lol! I have pretty bad neck(2 fusion surgeries) and back issues so this should be a life saver, or at least extender.

My 15yo son will help me install it and then he gets to continue to help me work on the cars, something he started really showing interest in starting 6 months or so ago and was part of the reason we decided to get the lift.

For now, it'll be lifting my 99 Boxster and 2 Subaru Crosstreks. My wife's Honda Pilot is a maybe given the size/weight and my hesitance to screw up her car with my wrenching. Gotta keep the queen happy.

I'll be going with a combo of the standard anchors and epoxy. I do believe it offers the best of both worlds. I'll update the thread when done or if I run into problems. I do have the contact info for a concrete company if required. My test holes were 4-5" so I expect to be fine.

I will extend my hoses to wall mount the pump in the near future as well.

Wish me luck!
 

Doug

Well-known member
Joined
Dec 20, 2005
Messages
152
Location
Salisbury, NC
I will extend my hoses to wall mount the pump in the near future as well.

Wish me luck!

I recommend mounting the power unit to one of the uprights. That's what I did as did many others. It makes for a cleaner installation, shorter hoses and less of a walk to get to the controls - Doug
 

Radman

Member
Joined
Feb 3, 2021
Messages
21
Location
Florida
I recommend mounting the power unit to one of the uprights. That's what I did as did many others. It makes for a cleaner installation, shorter hoses and less of a walk to get to the controls - Doug

Considering that as well. However, I'm not sure either column will be a perm mount, at least until I pour new concrete in the back bay, and that's why I'm thinking wall mount. Not in a rush to do either, just need to see how everything fits and get a little insight on how it will play out long term.
 

Denwood

Well-known member
Joined
Sep 22, 2014
Messages
4,180
Location
Thunder Bay, Ontario, Canada
If you're doing slab work, lay some conduit under .. I ran my lines under my slab and wall mounted the unit. Makes for a clean install:

final2.jpg
 

Radman

Member
Joined
Feb 3, 2021
Messages
21
Location
Florida
If you're doing slab work, lay some conduit under .. I ran my lines under my slab and wall mounted the unit. Makes for a clean install:

final2.jpg

I read through your build, fabulous transformation. In my case, slab work is a last resort and not in the plans at the moment. Test holes show the concrete to be thick enough at 4-5". However, if I must pour, conduit is probably the way to go, so thanks for the reminder!
 

MileHighRover

Well-known member
Joined
Mar 13, 2018
Messages
1,118
I mounted my pump on the column and installed stainless hardline. Much cleaner install. Those long, stiff hoses that came with the MX6 sucked. I had a hydraulic place make the hardline and shorter flexible lines.

You'll love the MaxJax. I've had zero issues with mine. Having a lift is really a game changer.

IMG-3765.jpg
 
Last edited:

Radman

Member
Joined
Feb 3, 2021
Messages
21
Location
Florida
Had one anchor that didn't bite. How have you guys pounded the old one down? Rebar? May also try to pull it out the top.

My son and I were working together but the epoxy in this hole dried before I got the anchor in. Yay. Drilled it out but I'm fairly sure it made the hole bigger. Tried using epoxy again and it spun at first but a couple of hours later wouldn't torque to 90ftlbs.

Otherwise:
 

Attachments

  • Lift2.jpg
    Lift2.jpg
    138.1 KB · Views: 128

Kilo70

Well-known member
Joined
Nov 12, 2007
Messages
158
Someone else had a thread about this problem and they said they sanded the inside and it cured the binding issue. Thread was maybe 3 months back.
Cheap grinder will 9fix it sounds like

Sent from my SM-N975U using Tapatalk
 

ejwan

Member
Joined
Apr 23, 2009
Messages
10
It’s been years since I used my maxjax. Was too hard to get to in the back yard.

Poured new footings and used epoxy anchors. Added an in-ground copper line in case I add an airline in the future, in-ground 1.5 electric pvc conduit pipe for the 2nd post to avoid the hydraulic hose. I’m happy with the results.

I made 4 tall stand and used manual bottle jack to keep the load stable on the lift. An extra 4 steps but piece of mind.
 

Attachments

  • 0479D97C-8EBD-4256-9B27-9761EB1C5646.jpg
    0479D97C-8EBD-4256-9B27-9761EB1C5646.jpg
    78.4 KB · Views: 122

PowerDubs

Well-known member
Joined
Jan 20, 2009
Messages
406
Just checking in I still have my max jax from the original preproduction group buy in 2009.

Use it all the time, just helped my buddy do brakes on his wife’s SUV.

It has never missed a beat.


Sent from my iPhone using Tapatalk
 

Richard D

Well-known member
Joined
Jan 19, 2007
Messages
1,921
Location
Texas City, between Houston and Galveston
It was a lot harder to find a 3/8 npt 45 degree swivel fitting than any other part of this job. I looked all over the web/ebay,Tractor Supply (where I bought the hoses and fittings) and Northern tool (where the lift came from), none of them had one. I did not go to any hydraulic shops...the only place I found one was at Aeroquipts website.

http://www.aeroquip.cc/2049-6-6sinternalpipeswivelxexternalpipe45degreeelbow.aspx

you need 3/8 to 3/8 just in case you did not know...

If I had planned to do what I did when I was assembling the lift I could have changed the fittings at the lift cylinder to make the line (with a 90 degree) go the direction I wanted. But since the lift was already assembled this was the easiest way...I simply unscrewed the quick release fitting, screwed the 45 on and reconnected the fitting. The fitting with shipping cost about $24.00 (not cheap but again I couldn't find it anywhere else) But the end result is it is EXACTLY the way I want it now and it works great. Hope this helps and post some pix!
I want to be able to find this later...
 
To avoid these ads, REGISTER NOW!
Top Bottom