To avoid these ads, REGISTER NOW!

rust removal

lis2323

Well-known member
Joined
Dec 25, 2016
Messages
3,234
You could certainly run that 3M 6 inch wheel on your Baldor. The 3M wheel comes with an assortment of bushings. I’ll bet you can easily make it work on a 3/4 inch shaft.


[.

Thanks I see that now. I don’t see any 8” diameter wheels listed.

Perhaps I’ll double up and use two 6” together to take advantage of the horsepower.


Sent from my iPad using Tapatalk
 
To avoid these ads, REGISTER NOW!

macgee

Well-known member
Joined
Jan 11, 2014
Messages
2,834
Location
Sepulveda Pass, CA
Has anyone tried either the 3M or Nyalox brush to replace wire wheels for things like cleaning bolt threads, and other grimy stuff, etc? Plan was to have one side with an EXL deburring wheel and the other with a wire wheel, but now wondering if I can swap it out for one of these.

If so, what color/grit are you running?

Sent from my IN2015 using The Garage Journal mobile app

I'll admit, wire wheel is the best for initial thread cleaning and removing clumps of dried paint layers, getting all that packed compressed grime out of the threads. The one thing that Radial brush wheel doesn't like are sharp threads like a main spindle of a vise, they tend to create a red dust from removing material off the wheel. Threads have that dirty grime that Radial wheels do not like as much and creates build up on the wheel.


Cruzan:
I think one of the problems would be the fact that the nylon bristles get dirty and contaminated with greasy dirt and then leave a hard film of burned on grease on the bits you are trying to polish.
I have not experimented with using Nyalox or the radial bristle brush wheels on dirty grease. I did get the burned on grease film after cleaning a socket that just had a normal old and used appearance.
You can clean the grease off of Nyalox wheels with a strong cleaner like Simple Green. There is a lot of heat generated at the surface of the bristles as they impact the work surface and generate friction to do the polishing job.

If anybody (macgee or ???) has actually tried this please report to the group.

Oily grime does effect the performance of the Radial brush wheel and Nyalox, the same way it does on sand paper, it can build up. This also happnes to wire wheels but it's not as obvious.
When I'm in a rush I will pour some rubbing alcohol on a clean piece of pine wood scrap and start wheeling it, the soft wood grabs/absorbs a lot of the grime and oil and I'll pour a little more R-A on the wood as its being wheeled, its not pretty but works/buys me time when in a pinch (its not the best solution).

The best is Goof Off or Simple Green soaking it in and using an old tooth brush to clean but requires taking the wheel off. You don't have to do it often but I am more mindful now to wheel items that are cleaner. I probably clean the wheels on avg. every six months but should do it quarterly. A lot depends if I wheel something dirty when I'm lazy, that happens a lot more often (being lazy). I do start wheeling a lot items still wet with rubbing alcohol on them that helps keep the wheel clean.

I stopped using Nyalox completely, see no use for them now after using radial wheel (IMHO); Theyre rough. Wire wheels have their purpose in life and I do use them but I only use the thin wire (under .009") ones, solid brass is ideal but now a days they're very expensive to source or even find as most cheap overseas ones are only brass tinned with steel underneath them. But a thin one of those is much better than the regular standard .015" steel wire ones. We're not trying to remove flux off new welds and you don't want to pit any good metal with a wire wheel. I can get away using a wire wheel without causing pitting if I'm carful and cautious but not always; with Nyalox it's so difficult to avoid the deep hair marks it makes on metal surfaces. Its fine if you're going to paint over it or you like that look but I stopped using them.

Would love to hear if anyone has a good inexpensive source for good thin dia. brass wire 6" or 8" wheels?

* lis2323: 3M does make a Radial Brush wheels in 8" in but only in the lower aggressive grits but they make a 220 and 400 grit in a 7 5/8" dia. size but I've never found one at a price I could justify as they're very expensive and hard to find. The 6" wheel can accommodate a 1" arbor. Remember these wheels like slower RPM's. I have mine on a Baldor long spindle slow polisher/buffer so the smaller dia. doesn't really hurt me. A 8" would be awesome, oh well.

I'm sure there's other who have much better info and experience than me that can chime in and give you better info. Have a good day in the shop, cheers
 
Last edited:

Shiftless

Well-known member
Joined
Mar 9, 2014
Messages
14,459
Location
East Bay SFO
Thanks again for sharing your experiences macgee. The alcohol on a soft wood block sounds like a good cleaning tool.

You mentioned that the radial brushes like lower rpms.
Running a 6 inch wheel instead of an 8 inch wheel would be equivalent to running the 8 inch wheel at a lower rpm. It’s the surface feet per minute that counts.

If an 8 inch wheel and a 6 inch wheel are running at the same rpm, the surface speed is about 25% less on the smaller wheel.
 

Cruzan80

Well-known member
Joined
Jul 22, 2015
Messages
4,156
Location
Denver, CO
cruzan: might I suggest picking up couple vintage grinders and having several different wheels on several grinders sort of like an assembly line. I actually bot a bunch of Craftsman grinder stands in the hope we were moving to a place where it already had a big shop or I could build one and life hasn't allowed that to happen yet.

I was wondering if someone was going to suggest that...:smiley:

I actually do have multiple grinders, and am trying to figure out the best setup between them. Right now, the plan is for a dedicated buffing head run off a 1/2hp motor (two buffing wheels for polishing) a Long C 1/3hp grinder with a deburring wheel and a wire wheel, and a Baldor 1/2hp with stones for sharpening the lathe tooling I have (either coarse/fine or swap in a carbide grinding wheel). Eventually plan on replacing it with a dedicated carbide grinder. While I plan on parts washing and/or ultrasonic cleaning the various hardware from things I am rebuilding, I was still planning on running it under a wire wheel to just finish everything up. That was why I was asking how it handled bolts and such.

If you have other suggestions for setting up "stations", please let me know. I have an early Block grinder (1/2hp) in the sale pile that I haven't listed yet, but am unsure where I would put it in my shop. I don't mind the occasional wheel swap when needed (brass/steel wire/Nyalox/3M?).

Sent from my IN2015 using The Garage Journal mobile app
 

lis2323

Well-known member
Joined
Dec 25, 2016
Messages
3,234
Here's a little polishing "station" with two dental lathes.

3a5df49606a64bf40284106729db1915.jpg


And a 2 HP Baldor

cb0fbf2bba2013c3a5edea7373993a77.jpg


Sent from my iPhone using Tapatalk
 

Attachments

  • cb0fbf2bba2013c3a5edea7373993a77.jpg
    cb0fbf2bba2013c3a5edea7373993a77.jpg
    214.7 KB · Views: 4
  • 3a5df49606a64bf40284106729db1915.jpg
    3a5df49606a64bf40284106729db1915.jpg
    559.1 KB · Views: 20

lis2323

Well-known member
Joined
Dec 25, 2016
Messages
3,234
@macgee and shiftless (and others). Thank you all for excellent insight.

Cheers


Sent from my iPhone using Tapatalk
 

drivesitfar

Well-known member
Joined
Oct 23, 2013
Messages
35,991
Location
Pacific Northwest
LIS: do you have an extra building lot next to you so maybe I can talk my bride into being a CANADIAN so I can be your neighbor. Or maybe at least be in your WILL?

again a lot of EYE CANDY well taken care of too. thanks for sharing!!

CRUZ: one way to use multiple grinders that takes up less space is on top of a rolling toolbox like i'm doing or another method is making hitch mounts for them on your workbench so you can swap grinders probably quicker than changing a wheel. here's the a few pics of some examples that you can see more on the VISE AND GRINDER THREAD IN FABRICATION if you haven't already seen it. here's the link:

https://www.garagejournal.com/forum/showthread.php?t=252799&highlight=vise+stands

anyway you do you and i'm just throwing out a few options you may or may not have already seen or know of.
 

Attachments

  • attachment12.jpg
    attachment12.jpg
    136 KB · Views: 74
  • attachment.jpg
    attachment.jpg
    135.9 KB · Views: 75
  • attachment11.jpg
    attachment11.jpg
    137.7 KB · Views: 83
  • attachmentVN34XJY9.jpg
    attachmentVN34XJY9.jpg
    123.8 KB · Views: 80
  • 20c25e1a21f1a5f4f1524012ca5f7570.jpg
    20c25e1a21f1a5f4f1524012ca5f7570.jpg
    126.2 KB · Views: 84

Shiftless

Well-known member
Joined
Mar 9, 2014
Messages
14,459
Location
East Bay SFO
lis:
Thanks for posting those pics. That dwarfs my little Blue Point 1/2 HP
 

Attachments

  • 641E1E61-3EA6-4AB1-A639-8835999ED97F.jpeg
    641E1E61-3EA6-4AB1-A639-8835999ED97F.jpeg
    127.8 KB · Views: 55

Cruzan80

Well-known member
Joined
Jul 22, 2015
Messages
4,156
Location
Denver, CO
Yeah, this is one of those cases where I know what to do, just have to get everything in place to see how it flows. Trying to squeeze too many machines into too little space. The buffer is going on top of a Vidmar, and I have stands for the other two. Even if I made a swappable base, it wouldn't help the way it is laid out. Storage space is almost as much of a premium as floor space.

Sent from my IN2015 using The Garage Journal mobile app
 

DIY_Guy79

Well-known member
Joined
Apr 30, 2019
Messages
424
Location
Tulsa, Ok
I use Vinegar all the time. But DONT LEAVE IT FOR A MONTH OR TWO! You wont have a vise left when you come back. Vinegar is very effective and works very fast. Your biggest problem though is getting the vinegar in cracks if the thing is seized. Its not exactly a penetrant. Its just acid, it eats away at whatever it has access to.

What I would do, first wash it with soap & water, maybe hit it with a hand wire brush to remove dirt. Then I'd put it in a bucket of vinegar. Check it every couple of hours just to make sure the vinegar isnt working too fast. After its ate away all of the visible rust or at least most of it, I'd take it out, wash it off in the sink with a Brillo pad. Make sure to rinse it extremely well to remove any vinegar. Now, first things first, coat the thing down with WD40 or PB Blaster, It will flash rust very quick after coming out of that vinegar if not. And while you're at it, make sure to get WD40 into anything that is still seized. If it's still seized, I'd soak it in a mixture of transmission fluid & kerosene... leave it as long as you want in this. Lay it on a different side every once in a while (laws of gravity still apply). Pull it out every once in a while and whomp on the moving parts with a hammer. The idea is to jar and stress the rust holding the moving parts together. Dont hit it too hard, you can break the cast iron. I'd use a block of wood between the hammer and wherever you're hitting to avoid leaving dings in it. Should have it fully functional in no time. If not, then you're just not holding your mouth in the right shape when swinging the hammer.
 

macgee

Well-known member
Joined
Jan 11, 2014
Messages
2,834
Location
Sepulveda Pass, CA
Your welcome lis2323,

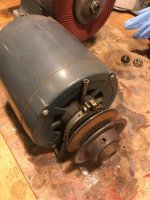
Sweet set up! Your 2HP is a very serious machine, is it three phase?

Also really nice, dental lathes, those are pristine, mine are not nearly as nice of a shape as yours, mine are still wearing the original worn-out paint but with fresh bearings. When you have those tooled up, they're awesome for small projects. Very practical, time saving when going through all the different steps of a restoration when you have the quick change tooling; it's so cool to use and everything is cheaper than 8" wheels :)

Cruzan80:

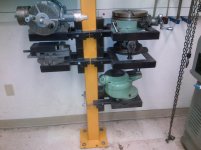
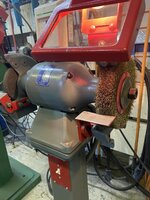
Space is always a premium, plus grinding and wheeling can be messy. I have four pedestals in a row along a wall that allows me to start on one side and move through them (rough to polish). You don't have to have four machines but I cant say enough about having some kind of similar set up for quick & productive work, even three or two (without stone wheels) could work. Personally, having this set-up would be in my top three recommendations to have in a shop (small or large). I use them almost everyday, more than any of my other machines. For me its a must have, the Mrs. loves these tools the most as a lot of house items get revamped and put back into service that she likes to use and look better than they did before hand.

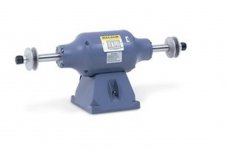
I have a friend who built a long narrow wood bench on the outside of his garage with four (4"x4") wood horizontal posts sticking out 12" from the bench all in a row, (like the pics above that Drives posted) spread out with grinders & polishers mounted to them. Its nothing special to look at, just 2"x 4"'s and 4"x4"'s put together but its very effective and solid for the work. I'm almost jealous, he has it separated from his shop in an area that wasn't good for much else, you know that spot outside of the garage along that wall in that dark area that no one ever goes to, that's too narrow to do much anything else with other than store your garbage cans?

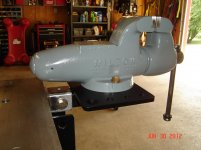
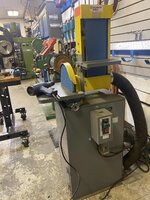
He mounted an awing above it to protect the set up from rain and working in the sun and hung lights over the grinders. He goes though an incredible amount of items everyday. At the rough side he has 360 swivel head vise, with a tool box of files, angle grinders and other tools for messy rough prep work, keeps degreaser trays and cleaners underneath, also has a belt grinder set up and 12" disc sander and then moves down the line untill the item is looking purdy and ready. Walks back into the shop where its still clean inside. It wasn't hard or expensive to do. It just an idea and oh, wear a mask!

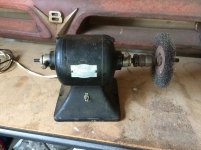
On one of my pedestals, I have a 8" 180 grit Pferd flap wheel that can be very useful, I use it a lot for shaping, it's more forgiving than my belt sanders/grinders or 12" disc. I use it a lot for the top and bottoms of bolts that were badly rusted and pitted needing the top surface removed or needing customizing. It's also really good for dressing hammers. Having all of this makes so many projects doable and very quick that I wouldn't take on the projects if I didn't have it.

Now I just wished I had the space and set up as lis2323, his shop is amazing as seen in many other threads on GJ. Love the custom base you made for your horizontal bandsaw.

I really like the trailer hitch receiver set up and table in pics 4 & 5 that Drives posted,
 
Last edited:

thehorse13

Well-known member
Joined
Mar 15, 2015
Messages
3,477
Location
Jefferson County, WV
Here's a little polishing "station" with two dental lathes.

Sent from my iPhone using Tapatalk

Those dental lathes are fantastic. I had a Red Devil two speed that I ended up selling because I never used it. I just fire up this little Baldor which is very convenient.
 

Attachments

  • IMG_3860.jpg
    IMG_3860.jpg
    144.2 KB · Views: 78

drivesitfar

Well-known member
Joined
Oct 23, 2013
Messages
35,991
Location
Pacific Northwest
DIY GUY: nice post about VINEGAR and de rusting.

Mac: if you happen to go see that friend again that has that outside grinder set up PLEASE take a few pictures and either post them here which is quickly becoming one of my favorite threads or on the vise and grinder thread over in Fabrication. that sounds awesome and he keeps the mess outside too.

BTW I think we would all like to have a shop like LIS wouldn't we? I think he woke up one morning about 20 years ago and said I'm going to improve this shop every day I wake up somehow and I think he has and at almost 70 years old he still is making cool stuff.
 

d42jeep

Well-known member
Joined
Oct 22, 2014
Messages
16,484
Location
Northern California
Thanks to macgee’s Zoro tip, my wheel arrived yesterday. I got it installed and have been trying it out today. As has been mentioned, it took a little while to smooth out but I’m happy with the results so far. I started with some tools I didn’t care about. The pebble ratchet looks much different now.
-Don2146DC05-582E-410E-8D17-173A80C1C682.jpgB8BDD03A-4A09-4114-9EAF-E9313511D07A.jpg209CBC4B-F311-4030-9E7F-1E332EF95205.jpg7EF2956E-E704-4410-B64C-C02911BB88D3.jpg2EA43593-5B3D-410A-A4BE-8CC48FAD9DFE.jpgBBCA4EBC-E594-4476-904E-F634F67DF47B.jpg4D4C9445-8635-4702-AD00-08FFC9EC0B54.jpg
 
Last edited:

macgee

Well-known member
Joined
Jan 11, 2014
Messages
2,834
Location
Sepulveda Pass, CA
Nice Don,

I'm hoping you think it was worth the price and using? Definitely let it break in a bit more before judging the finish. You can really push hard into these wheels without getting bit back but then it gets very aggressive and leaves a deeper hair satin finish and can remove things that you didn't want gone. I always finish with a light pressure go around to help remove satin look or keep a constant angle while passing the whole tool through the wheel to give it a nice looking even uniformed satin finish. Need to experiment as different metal react differently to it, hardened metal gives off the best finish.

A quick soak in evaporust, clean off with rubbing alcohol out of the bath and then Radial brush wheel seems to get the best finish.
There is a little technique needed when hitting bumps and low spots/holes, you'll notice an uneven trail in the path left behind afterwards from the wheel being disturbed going over them. Practice makes perfect.

By the way, these wheels work great refinishing Starrett and similar compass dividers, they're also are really good to practice your technique on them to nail the finish and tricks of holding it as you'll quickly notice the finish direction you're making on piece and the spots you need to go around or go back to make it look more even.
I usually take the compass completely apart, the little ball at the end of the thread is only screwed on and comes off rubber jaw pliers. I use lock ring pliers to remove the spring and put back on.

Thanks again Don for those springs! Cheers
 
Last edited:

drivesitfar

Well-known member
Joined
Oct 23, 2013
Messages
35,991
Location
Pacific Northwest
Shift: I know Baldor had 2 different speed buffers cause I used to own a 1750 and 3500 and since I was tight on space and still am the 1750 has long since left the building.

I'm not sure how many other grinders have the slower (1/2 speed) grinders but that would be the easiest way to slow it down.

some members have put DC motors (old Treadmills have them you can usually find cheap if don't want to buy a new one) on their bandsaws so they could cut metal instead of wood. i've also seen some creative guys figure out how to get the DC motor on a speed switch instead of just on off, but that was above my pay grade on knowing how they did it.

maybe somebody will see your post and in the meantime you might want to ask the same question on the Block grinder thread and the VINTAGE GRINDER thread too. And maybe GOOGLE is your friend and you can tell us how after you find out.
 
To avoid these ads, REGISTER NOW!

lis2323

Well-known member
Joined
Dec 25, 2016
Messages
3,234
The “best” way to have speed control on a polisher is pick up one with a three phase motor and add a VFD.

I just recently passed up two nice Baldor polishers with VFD’s. One five horse, the other 7 1/2 horse. These would typically come from chrome and plating shops.


Sent from my iPad using Tapatalk
 

Shiftless

Well-known member
Joined
Mar 9, 2014
Messages
14,459
Location
East Bay SFO
The “best” way to have speed control on a polisher is pick up one with a three phase motor and add a VFD.

I just recently passed up two nice Baldor polishers with VFD’s. One five horse, the other 7 1/2 horse. These would typically come from chrome and plating shops.


Sent from my iPad using Tapatalk

Yep...that will be the best. No loss of torque as the speed is reduced.
But I hardly need more than one horsepower.
 

macgee

Well-known member
Joined
Jan 11, 2014
Messages
2,834
Location
Sepulveda Pass, CA
A cheap way of getting a slow wheeling machine that I've seen often in peoples home shops is to get an old Craftsman 115.6962 dual spindle 1750 rpm motor in either 3/4 hp and 1/2 hp. They're fairly easy to find locally (I'm sure it would be easy for Shift, Don and Drives to find in their areas). Just add some arbors to them.

I actually have a couple in the rebuild pile that are for a lathe and drill press. They're super easy and cheap to rebuild and install new bearings in them so look for a cheap wonky one that some wants to get rid of.

Some examples found online (not mine) of what they look like, I couldn't really find one online with wheels but you get the idea. The poor mans buffer :) They're not pretty and definitely do not recommend stone wheels on them but would work well with Radial Bristle brush wheels.

Other than that, the only other option that I can think of is to find a VFD/three phase or a slow speed version buffer. Treadmill motor option wouldn't work unless you went the old school method with belt and separate bearing and arbor housing, thats how it was done back in the day by the pro's.


27218362555_ddbe06b67f_b.jpg


50978302291_6d47c68a90_c.jpg

$_1.jpg
 
Last edited:

Heats00

Member
Joined
Nov 20, 2020
Messages
8
Location
East Central, WI
I've been using Evaporust in a heated ultrasonic cleaner and its been working wonderful and quick!

I'll have to take some pictures during the next rust abatement session.
 

drivesitfar

Well-known member
Joined
Oct 23, 2013
Messages
35,991
Location
Pacific Northwest
MAC: thanks for posting up pics and mentioning the slower speed motors cause I knew Baldor wasn't the only one making ones that used 110v.

ALL: wouldn't it be nice to have room for a bunch of big 3 phase machines on VFD's. i barely have enough room for a drill press and a couple grinders at the minute.
 

Shiftless

Well-known member
Joined
Mar 9, 2014
Messages
14,459
Location
East Bay SFO
I found a motor at a local salvage place in Berkeley. Here’s what I got for $20

The plate says 1725 rpm and 3.0 amps. Continuous duty rated. What is this, a furnace blower motor?

I got the pulley off, cleaned the case and I see it has a half inch shaft with a nice big flat.

The open housing isn’t the best for buffing debris and polishing operations with the radial wheel.

And it only has one shaft instead of 2 but I figure it’s a good place to start experimenting with the lower speed.

It’s missing the terminal cover for the wire connections in the back.

Now for an arbor shaft adapter. Any recommendations?


.
 

Attachments

  • 7117D601-996C-4F33-AE48-F2F2EC838E81.jpg
    7117D601-996C-4F33-AE48-F2F2EC838E81.jpg
    95.5 KB · Views: 44
  • 55281FBF-536B-485F-8204-597BAB5DDE81.jpg
    55281FBF-536B-485F-8204-597BAB5DDE81.jpg
    91 KB · Views: 47
  • 5715ECC0-CB62-4E6B-AC5B-FB6D88986808.jpg
    5715ECC0-CB62-4E6B-AC5B-FB6D88986808.jpg
    93.7 KB · Views: 48
  • B5E5FFDF-AD4F-44AA-9E07-4FF83E0A1943.jpg
    B5E5FFDF-AD4F-44AA-9E07-4FF83E0A1943.jpg
    90.8 KB · Views: 45
Last edited:

drivesitfar

Well-known member
Joined
Oct 23, 2013
Messages
35,991
Location
Pacific Northwest
Shift: make your post on the block grinder thread cause many of those guys have turned a side of their block grinder to a buffer with extensions that should fit your little motor
 

Shiftless

Well-known member
Joined
Mar 9, 2014
Messages
14,459
Location
East Bay SFO
Shift: make your post on the block grinder thread cause many of those guys have turned a side of their block grinder to a buffer with extensions that should fit your little motor

There are several different arbor shaft adapters available in the under $10 range.
 

drivesitfar

Well-known member
Joined
Oct 23, 2013
Messages
35,991
Location
Pacific Northwest
Shift: I bet there are a lot of inexpensive options to extend your arbor on your little motor. the key is trying to keep the debris and dust and gunk out of the motor so longer arms might help.

one of the machinist was making longer extensions for the block guys, but they cost about as much as the grinders so he didn't make or sell many.

so if you can somehow find or make a 4-6 inch extension for your wheel and maybe make some sort of shield over the motor you might have yourself a nice little tool to shine up more old steel.

good luck
 

Shiftless

Well-known member
Joined
Mar 9, 2014
Messages
14,459
Location
East Bay SFO
Yes, I was thinking of a sheet metal shield. I’m not too concerned with the motor overheating because I typically use my bristle wheel for less than a minute at a time. Plus it’s not inside a furnace or a tightly enclosed space like it was designed for.

I do need to integrate an on-off switch though...

Of course, this 1HP Baldor running at 1800 RPM is only $1041 plus tax and it has two shafts and a nice built in switch. :)
 

Attachments

  • DE7C9E85-BB2E-48F4-B28C-13DBBC6DE119.jpeg
    DE7C9E85-BB2E-48F4-B28C-13DBBC6DE119.jpeg
    30.8 KB · Views: 40
Last edited:

lis2323

Well-known member
Joined
Dec 25, 2016
Messages
3,234
Now for an arbor shaft adapter. Any recommendations?


.

Maybe set up a multi pulley system with a belt driven arbor.

Mount the motor higher than the arbor to get it (somewhat) out of the “dust” zone and to decrease footprint. This would allow you to have a longer arbor (with TWO ends ) and enable you to speed it up if desired.


Sent from my iPad using Tapatalk
 

Shiftless

Well-known member
Joined
Mar 9, 2014
Messages
14,459
Location
East Bay SFO
Maybe set up a multi pulley system with a belt driven arbor.

Mount the motor higher than the arbor to get it (somewhat) out of the “dust” zone and to decrease footprint. This would allow you to have a longer arbor (with TWO ends ) and enable you to speed it up if desired.


Sent from my iPad using Tapatalk

Thanks for that idea. By varying the pulley sizes a guy could get just about any RPM he wanted.
I doubt that it’s going to make a lot of difference. As macgee has already said, the finish using his slow speed 1700 IIRC, vs. my 3500 Blue Point machine might be noticeable, but 3 phase motors with VFD’s for infinite control up to full speed might just be overkill. But hey... this is GJ right?

Same wheel, same workpiece, different speed...there is an experiment worth doing.
 

drivesitfar

Well-known member
Joined
Oct 23, 2013
Messages
35,991
Location
Pacific Northwest
Shift: yep good machines are not cheap, but 1hp Baldor is not a toy either. I bet that machine could run 24/7 for 5 years and keep running.

If you get to thinking you want to upgrade to a little spendier option than that check out BURR KING belt grinders if you want to grind or spiff up some metal.

LIS: great idea with the multy belts!!
 

Shiftless

Well-known member
Joined
Mar 9, 2014
Messages
14,459
Location
East Bay SFO
I wired up that low RPM Westinghouse motor to see how well it ran. It runs quietly and smoothly but of course in the wrong direction. Being right handed I want to mount the brush wheel on the right side of the motor.

After a bit of online research I found out that this style motor is reversible. I took the ends off, cleaned out the small amount of carbon inside, checked the bearings, and reversed the proper leads. It now runs the way I want it to... CCW when looking straight at the motor shaft.

UPDATE: I just ordered the motor shaft arbor adapter and will install and report late next week.

.
 
Last edited:

drivesitfar

Well-known member
Joined
Oct 23, 2013
Messages
35,991
Location
Pacific Northwest
Shift: I hope the new arbor fits and works great for you. nice work getting the motor fingered out so you can have it set up on the side you like to use it.
 

Shiftless

Well-known member
Joined
Mar 9, 2014
Messages
14,459
Location
East Bay SFO
Shift: I hope the new arbor fits and works great for you. nice work getting the motor fingered out so you can have it set up on the side you like to use it.

Thanks. Being right handed, it would have been awkward to have the motor in the way when wheeling most parts. There are motor arbor adapters available with RH and LH threads to use on different sides of a motor.
 
Last edited:

drivesitfar

Well-known member
Joined
Oct 23, 2013
Messages
35,991
Location
Pacific Northwest
Shift: since you've got a flat side on your arbor's arm you might not need a threaded extension. :dunno:

I know we were thinking threaded extensions on the block grinder's thread cause we didn't want to damage the original arbors.

or are you talking about removing old arbor/arm and replacing it with a new longer one?
 

lis2323

Well-known member
Joined
Dec 25, 2016
Messages
3,234
I decided to just put 8” wire wheels on the 3/4 HP Baldor.

7912efa157015b813c2b7d873171e1a4.jpg

And maybe try some 6” 3M bristle brushes on a smaller machine.

Yesterday was abrasive day and I replaced the belt and disc on the Kalamazoo..

222a61874760d72a5dd6e152b3c64b8e.jpg

and the Burr King

1edc51bdd31766fb336f811fa6d12068.jpg

A lot of members seem to like the 3M Scotchbrite belts and I decided to order one each of the fine and medium. I’m looking forward to trying them out when they get here.


Sent from my iPad using Tapatalk
 

Attachments

  • 7912efa157015b813c2b7d873171e1a4.jpg
    7912efa157015b813c2b7d873171e1a4.jpg
    264.6 KB · Views: 6
  • 222a61874760d72a5dd6e152b3c64b8e.jpg
    222a61874760d72a5dd6e152b3c64b8e.jpg
    301 KB · Views: 4
  • 1edc51bdd31766fb336f811fa6d12068.jpg
    1edc51bdd31766fb336f811fa6d12068.jpg
    332.5 KB · Views: 4
To avoid these ads, REGISTER NOW!
Top Bottom