To avoid these ads, REGISTER NOW!

The Original "Cordless" Drills

Eric Brown

ALLIANCE MEMBER
Joined
Jun 14, 2024
Messages
678
Pat No. 3457?62. Probably wrong on the numbers

Running the ? as 0-9 got nothing in US patents. Also tried changing your leading number to a 2, still nothing. Can we get a better pic of the number?
Added new picture to the original post.
 
To avoid these ads, REGISTER NOW!

Eric Brown

ALLIANCE MEMBER
Joined
Jun 14, 2024
Messages
678
Pat No. 3457?62. Probably wrong on the numbers

Running the ? as 0-9 got nothing in US patents. Also tried changing your leading number to a 2, still nothing. Can we get a better pic of the number?
Found it and I was wrong, it's a hook setter. Edited the above post to correct and add pictures.
 
  • Like
Reactions: RTM

Old tool guy

Well-known member
Joined
Apr 13, 2023
Messages
3,273
I thought I had posted this earlier but i can’t find it. Any ideas what this is? No markings. It’s obviously some type of corner drill, there is a flat on one side of the head and the short stub shaft at the square corner does turn the chuck.

IMG_9432.jpeg
 

Old tool guy

Well-known member
Joined
Apr 13, 2023
Messages
3,273
Thanks, i will go through those references. The initial link you provided goes to “geared” braces, which are different from mine, mine does not have the driven gear.
 

Eric Brown

ALLIANCE MEMBER
Joined
Jun 14, 2024
Messages
678
Thanks, i will go through those references. The initial link you provided goes to “geared” braces, which are different from mine, mine does not have the driven gear.
Look again at the first two pictures. I think they are a match.
 

Attachments

  • Bennett & Bloedel.jpg
    Bennett & Bloedel.jpg
    8.2 KB · Views: 18

Old tool guy

Well-known member
Joined
Apr 13, 2023
Messages
3,273
I am seeing the top part of the frame as a twisted spiral. Maybe it’s just the pixeling of the photo.
 

WisJim

Well-known member
Joined
Dec 20, 2010
Messages
2,282
Location
Menomonie, WI
Here are my Bennet-Bloedel drill braces. The one with the tag has the knob or pad replaced with a common round one, and I made the crank arm for it many years ago, based on dimensions given me by someone on the Old Tools list.

Bennet-Bloedel.jpg
 

Old tool guy

Well-known member
Joined
Apr 13, 2023
Messages
3,273
Just got this tenoning attachment, trying to figure out the manufacturer. Overall it’s in great condition, most of the japanning is still on it. I have not cleaned it yet, but so far the only mark is a patrnt date on the blade holder: Mar 5 78.
.IMG_9462.jpeg
.
IMG_9463.jpeg
.IMG_9464.jpeg
.
IMG_9465.jpeg
 

Eric Brown

ALLIANCE MEMBER
Joined
Jun 14, 2024
Messages
678
Just got this tenoning attachment, trying to figure out the manufacturer. Overall it’s in great condition, most of the japanning is still on it. I have not cleaned it yet, but so far the only mark is a patrnt date on the blade holder: Mar 5 78.
.IMG_9462.jpeg
.
IMG_9463.jpeg
.IMG_9464.jpeg
.
IMG_9465.jpeg
This would be a Stearns. Patent attached.
 

Attachments

  • US201064 Stearns 1878.pdf
    94.1 KB · Views: 4

Old tool guy

Well-known member
Joined
Apr 13, 2023
Messages
3,273
Started in on cleaning up the Stearns tenon device, itks in great condition, except there is a little more pitting on the blade than i had expected. And i was surprised to see that the blade is double beveled.
.
IMG_3575.jpeg
 
To avoid these ads, REGISTER NOW!

RTM

Well-known member
Joined
May 13, 2019
Messages
13,167
Location
SF Bay Area
there is a little more pitting on the blade than i had expected. And i was surprised to see that the blade is double beveled.
That can be a blessing and a curse. The back bevel can make pitting less of a concern. But if the tool is not set up for a double bevel, sharpening it away is a PITA. The patent may tell you more
 

Old tool guy

Well-known member
Joined
Apr 13, 2023
Messages
3,273
Was able to copy off the patent description.

This cutter is beveled on both sides, so that it can be reversed, and wear either side up alternately, to equalize it.
 
  • Like
Reactions: RTM

Old tool guy

Well-known member
Joined
Apr 13, 2023
Messages
3,273
In post #295 i showed a tenon auger, cleaned it up, re-japanned, sharpened the blade. Didn’t work well. I think part of the problem was getting it started on the square stock. So i bought a spoke pointer.
IMG_9534.jpeg
E C Stearns model 0, picture is from the 1924 catalog. $1 each. It is in very good condition, mostly just dirt and grime, except that some previous owner applied a thick paint to the blade, screw and washer. Got that off. Now i need to finish sharpening the blade and try it out. The blade is very thin, only about 0.050” or just over 1 mm.
IMG_9529.jpegIMG_9531.jpegIMG_9533.jpegIMG_9532.jpeg
 

RTM

Well-known member
Joined
May 13, 2019
Messages
13,167
Location
SF Bay Area
think part of the problem was getting it started on the square stock. So i bought a spoke pointer.
Definitely a problem with tenon cutters. Next you will need a smaller one for tiny tenons


I thought cutting the square down to an octagon would help, but way too slow for a few $ invested in a pointer
 
Last edited:

d42jeep

Well-known member
Joined
Oct 22, 2014
Messages
16,546
Location
Northern California
Yesterday was expansive bit day. I finally found a replacement for my early broken Convalco bit that Ives in my NAF toolbox. It came from an eBay seller. The large cutter was missing


IMG_8402.jpeg

I added the cutter from my broken bit. IMG_8414.jpegIMG_8415.jpeg
it‘s now back in the NAF boxIMG_8416.jpegIMG_8417.jpeg
-Don
 
Last edited:

d42jeep

Well-known member
Joined
Oct 22, 2014
Messages
16,546
Location
Northern California
I cleaned up this rusty bit found at a recent estate sale.
IMG_0467.jpeg
it turned out to be a Greenlee wheel adjusting bit in quite good condition. IMG_8422.jpegIMG_8421.jpegIMG_8422.jpegIMG_8423.jpegIMG_8424.jpeg
-Don
 

Attachments

  • IMG_8420.jpeg
    IMG_8420.jpeg
    94.2 KB · Views: 2

Eric Brown

ALLIANCE MEMBER
Joined
Jun 14, 2024
Messages
678
Yesterday was expansive bit day. I finally found a replacement for my early broken Convalco bit that Ives in my NAF toolbox. It came from an eBay seller. The large cutter was missing


IMG_8402.jpeg

I added the cutter from my broken bit. IMG_8414.jpegIMG_8415.jpeg
it‘s now back in the NAF boxIMG_8416.jpegIMG_8417.jpeg
-Don
Take the broken one, cut the end off and then grind a screwdriver tip on it. Or is you can weld, put a 3/8" square drive end on it. It can still be usefull.
 

Old tool guy

Well-known member
Joined
Apr 13, 2023
Messages
3,273
Need a little help cleaning this up: the crank handle and gear.

IMG_9484.jpeg
.
The handle was japanned and the gear was painted red all over, except the teeth. The also look like different kinds of metal, and in fact they are 2 parts pressed together and pinned to prevent slippage. I don’t plan to disassemble them, but i do plan to re-japan everything that was, and paint everything red that was.

So the question is … how do i mask off the teeth when i spray paint the red.
.
IMG_9603.jpegIMG_9605.jpeg
 

Eric Brown

ALLIANCE MEMBER
Joined
Jun 14, 2024
Messages
678
Two ways come to mind. Put some blue tape on a sheet of plastic and then use a knife or gasket cutter to cut out a ring. There would still be a little overspray on the ends of the teeth that could be cleaned with a wire brush,

One tool I use for some nickel plating is a masking lacquer. You would paint it on as a thick coating over the teeth. Do your other work and then the mask just peels off

One source: https://caswellplating.com/mask-it-masking-lacquer-8-oz.html
 

Eric Brown

ALLIANCE MEMBER
Joined
Jun 14, 2024
Messages
678
Was plating today and used the masking lacquer. Took picture so you can see how it removes. In the picture are two sections out of similar push drills. I didn't want to plate the spirals because the plating may make the tolerance too tight. The blue peels right off.

IMG_7072.JPG
 

Gmonkee

Well-known member
Joined
May 9, 2010
Messages
2,806
These were my attempt to become a bit more efficient on an extreme budget years ago. I made artisanal furniture for fun. The one is new, the others broken junk from street markets. I patched them up to useful from spare bits I had . Ball bearing replacement handles are nice.

These are working tools before we had too many battery drills here. Not pretty, not perfect specimens of the tool.

One is hex bits, another a regular drill chuck and the last for the proper bits for them.

You can still buy the yellow and black Pretul from the current Truper catalog. It's ok but cheap plastic.IMG_20260529_104350.jpg
 

59Sled

Well-known member
Joined
Sep 22, 2025
Messages
151
Location
Santa Clarita, California
I enjoyed restoring a my first eggbeater drill (see post above) that I went back to the same antique store and bought 2 more.
Couldn't pass up his prices on them.

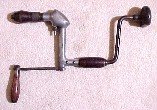
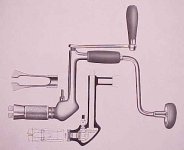
First is a crusty Dunlap. Not sure what model it is. Also not sure if there is even various models of a Dunlap.

3.jpg33.jpg


Second one has no markings on it other than it being stamped in 2 places with "BW"
With the hexagon main chassis, it looks like a Defiance by Stanley to me. But every Defiance I look up is slightly different.
Either the big gear is different looking, or it has markings on the ferrule, or they don't have a third knob.

Any ideas on a maker or is it a Defiance?

2.jpg22.jpg
 

Old tool guy

Well-known member
Joined
Apr 13, 2023
Messages
3,273
Need a little help please. I’m in the reassembly phase of my drill press and i need confirmation of a detail. Can somebody please remove this screw and tell me what's behind it. The screw is not long enough to go all the way through the threaded boss, pretty sure there is a spring and ball bearing hidden in there. I think it's part of the auto-feed mechanism. I have the screw and spring, but indon’t have whatever the spring pushes forward.

Just to the left of that knob you can see an exposed part of the shaft, and you can see the edge of a groove into which a key slides, that key connect the small shaft mounted gear to the shaft so it can be driven by the crank handle. Because the keyway runs almost the full length of the shaft, i assume it keeps the small gear engaged to the shaft as the shaft goes up & down.
.
IMG_9693.jpeg
 

Old tool guy

Well-known member
Joined
Apr 13, 2023
Messages
3,273
A couple more details. The chuck threads on to the fine threads on one end, the flywheel threads on to the coarse threads on the top end of the shaft. The pin connects the bevel gear to the shaft, the lengthwise groove allows the gear to move up & down the shaft while still connecting them. Instill don’t understand how the self feed works, maybe it will become evident when it’s all assembled and moving easily.
.
IMG_9708.jpegIMG_9710.jpeg
 
To avoid these ads, REGISTER NOW!
Top Bottom