Okay, yeah got ya, but why The Berline Wall? Well sit back in your chair and I'll tell ya'll a tale ladies and gentlemen. You've read of many of the tools my grandfather has passed down to me, his name was simply Berline, no middle name, just Berline. Legend has it he was named after Berlin, Germany, he was born in 1922 before any of the Nazi happenings that were a dark time in our worlds history began. Then he was in the Army in WW2, fighting against the country in which his name was derived. Well I was named after both of my grandfathers and because my parents didn't want to show favoritism they simply call me JB. So there you have it, the story behind The Berline Wall.
Sure glad your grandfather wasn't named IHOP
No really, that's cool being named after our grandfathers. I tried to get my daughter to name one of her sons after me since I'm the end of my family name (as males go). But she had to name them the latest trendy name like Adian. Nobody in our family has that name,and it kindda pisses me off at times.
I've been wanting to burn some of my land off, but its hard to round a few people up when the weather and wind are right. I guess I'll have to wait on my neighbor to burn then light mine at the same time.
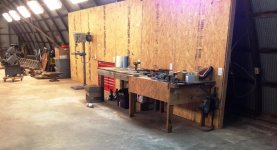
Having a flat wall will make it nice to hang signs an stuff on, I'm sure the curve wall makes it difficult.
Sure glad your grandfather wasn't named IHOP
No really, that's cool being named after our grandfathers. I tried to get my daughter to name one of her sons after me since I'm the end of my family name (as males go). But she had to name them the latest trendy name like Adian. Nobody in our family has that name,and it kindda pisses me off at times.
I've been wanting to burn some of my land off, but its hard to round a few people up when the weather and wind are right. I guess I'll have to wait on my neighbor to burn then light mine at the same time.
Having a flat wall will make it nice to hang signs an stuff on, I'm sure the curve wall makes it difficult.


 That means I'll be able to spend a couple extra dollars a month out here and should be able to make some purchases I've been putting off. As well I'll be able to start actually looking seriously into buying parts for my Cobra. Until next time you will all just have to dream about the possible old tools I'll be showing you. (oops I've said too much.)