OP
jimreed2160
Well-known member
Mortise and Tenon joint
Time for a tutorial. The mortise and tenon joint is a strong and effective way to join wood at a right angle. It so effective, in fact, that the concept has been around about seven thousand years (!). Today I am making a pattern joint. Doing it right takes thought for design and also takes time to set up your marking tools. But once I have the pattern joint, I can measure directly from it and save lots of time and thinking.
First up is the wood stock. The tenon is one inch thick and the mortice (think table leg) is 2 5/16".

For the best strength, I like the tenon thickness to be at least half of the total skirt thickness. That means that the tenon should be 1/2". The mortice is also that thickness. Here I am setting the marking pins.

Next, I set the stop for about a 3/8" recess.

I marked the mortice with pins and marked the end with chalk.

Once the mortice is marked, I move over to the drill press and drill a few holes to remove stock. I find that the mortice machine works better on walnut stock if it does not have to work so hard. I used the DP to punch some 3/8 holes in the mortice.

Then it is time to use the hollow chisel mortise machine.


It works best if you skip and leave space between holes.

Then you come back around and punch holes between the previous holes. At some point you are done. I finish up with a chisel to knock off high spots and to clean out chips.

And then we have a clean hole.

Notice the deep hole on the inside end. I like to start there rather than the edge. It provides a place to bury mistakes. In this case, I had set up the stop but then removed a piece of wood under it to set the fence. When I punched the hole, I could tell I went too deep. I corrected the stop and continued. Once the tenon is in place, this mistake will be buried DEEP.
Now it is time to work on the tenon. I always mark my stock so I can keep it oriented properly. Sometimes there are grain issues and sometimes there are size issues. Marking the stock makes fitting error free.

Here are the marks for the tenon. Yes, there are two lines. Just cut to the most aggressive one.

I like the bandsaw for roughing out tenons and always cut them generously.

They are only tenons. If you cut too much you can glue up stock and cut them again. But cutting generously and trimming usually saves time.
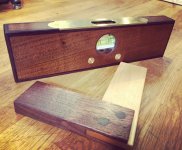
And here are out roughed out joint pieces.

It is time for me to take a break. I will finish up tomorrow with the trimming and fitting. Thanks for watching.
Time for a tutorial. The mortise and tenon joint is a strong and effective way to join wood at a right angle. It so effective, in fact, that the concept has been around about seven thousand years (!). Today I am making a pattern joint. Doing it right takes thought for design and also takes time to set up your marking tools. But once I have the pattern joint, I can measure directly from it and save lots of time and thinking.
First up is the wood stock. The tenon is one inch thick and the mortice (think table leg) is 2 5/16".
For the best strength, I like the tenon thickness to be at least half of the total skirt thickness. That means that the tenon should be 1/2". The mortice is also that thickness. Here I am setting the marking pins.
Next, I set the stop for about a 3/8" recess.
I marked the mortice with pins and marked the end with chalk.
Once the mortice is marked, I move over to the drill press and drill a few holes to remove stock. I find that the mortice machine works better on walnut stock if it does not have to work so hard. I used the DP to punch some 3/8 holes in the mortice.
Then it is time to use the hollow chisel mortise machine.
It works best if you skip and leave space between holes.
Then you come back around and punch holes between the previous holes. At some point you are done. I finish up with a chisel to knock off high spots and to clean out chips.
And then we have a clean hole.
Notice the deep hole on the inside end. I like to start there rather than the edge. It provides a place to bury mistakes. In this case, I had set up the stop but then removed a piece of wood under it to set the fence. When I punched the hole, I could tell I went too deep. I corrected the stop and continued. Once the tenon is in place, this mistake will be buried DEEP.
Now it is time to work on the tenon. I always mark my stock so I can keep it oriented properly. Sometimes there are grain issues and sometimes there are size issues. Marking the stock makes fitting error free.
Here are the marks for the tenon. Yes, there are two lines. Just cut to the most aggressive one.
I like the bandsaw for roughing out tenons and always cut them generously.
They are only tenons. If you cut too much you can glue up stock and cut them again. But cutting generously and trimming usually saves time.
And here are out roughed out joint pieces.
It is time for me to take a break. I will finish up tomorrow with the trimming and fitting. Thanks for watching.
Last edited: