Richard D
Well-known member
Thanks for the info Steve, it will help many of us.


I have a waterfall coming from the seal. LolI'd be interested in a FB group. How do you know if a seal has gone, is it pretty obvious and the cylinder no longer rises properly? My Maxjax MX6 is 5 years old but it doesn't see "heavy" use, but I have had issue with one side raising faster than the other and had to add a flow control valve.
How much is there that needs to be said or asked about these lifts? There's basically only floor mounting, hydraulics, modifications and repair questions to be discussed. These topics are well covered on this forum. That being said, I'd join a FB group anyway.Had a seal blow on an older rod style lock Dannmar MaxJax Hydraulic cylinder. Any idea if the replacements on the MaxJax site are the same as the older style one? Got quoted $240 per cylinder to rebuild.
Hydraulic Cylinder
This is the genuine MaxJax® HVLP direct-drive cylinder that was designed to minimize leakage and offer better reliability and smoother operation. It features a one-piece, pilot-fitted machined steel piston wrapped with specially designed, pressure-loaded U-cup seals, backups and wear bands. The...www.maxjax.com
Also anyone have any interest in creating a MaxJax owners group on FB?
Although my Max Jax is installed differently (shown on another Garage Journal thread), just some thoughts or ideas...Just found this thread, reposting.
Gents,
Would like any opinions concerning the attached picture of my wedge anchors. The anchors have pulled up slightly above the concrete, but torque to 90ft/lbs as specified in the shoddy at best instructions. Is this OK, or do I need to redo with epoxy anchors?
Thanks for any and all responses.
v/r, NoviceWrench


I thought the recommendation was torque to 90 ft. lbs. Can you tell me where you found the above quote?
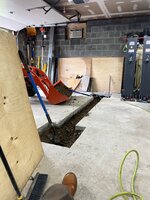
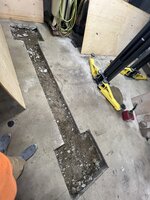
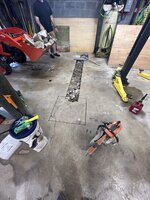
Looks great! How wide is your garage? Fitment looks great but I worry these pics are deceiving and likely my garage is just too small for this setupI waited 26 days for the concrete to cure before drilling. I used a new a Bosch 7/8" bit and it felt pretty worn out by the time i got to the 10th hole @ 6.5" deep. I went with the max spacing, 135" measured from outer edge of base plates.
Each hole went through ~10x cycles of brushing and blowing with clean compressed air from the bottom until no dust was expelled followed by a gentle brushing with an acetone soaked towel and more air to fully evaporate the acetone.
I didn't take pictures when installing the anchors due to epoxy working time. It was abut 85 degrees and low-ish humidity when I set them, but working time seemed fine. Bolts were wrapped with 3/4 masking tape at the top of the threads and screwed into the anchors until the tape began to thread in. I used a a high-leverage caulking gun (https://www.amazon.com/gp/product/B008DYN9JO/?tag=atomicindus08-20) and went through the entire tube of supplied epoxy for 6 of the 10 of them. Mine shipped with PC Concrete (https://www.pcepoxy.com/products/concrete-repair/pc-concrete/) which isn't pictured in any of the literature from MaxJax. I bought a 2nd tube of the same epoxy from my local Ace hardware for the remaining 4 anchors. After a few holes I settled on nine full squeezes of the trigger with the nozzle at the bottom of the hole. Epoxy was injected one at at time and the anchor inserted with a clockwise twisting motion until they could not be pushed down further by hand. It took a surprising amount of force to push them flush and see excess epoxy expelled. I started with a decent size ball peen hammer then switched to a 10lb sledge.
I wall mounted the pump and extended one of the hoses with a union and https://www.amazon.com/gp/product/B000LNXRAG/?tag=atomicindus08-20. I also installed high-pressure 2.5" ******* at the cylinders & 90 degree fittings instead of the supplied 45 degree fittings since I ran hoses overhead. The supplied liquid sealant was used on the NPT fittings (not the JIC from pump to flow divider) and all are leak free so far.
MaxJax says "maximum tightening torque of Anchors is not to exceed 60 ft. lbf" so after 48hrs of epoxy curing time I installed at 55 ft/lbs and bled the system. AW 32 hydraulic oil was used as it smells far less that ATF. I zip-tied some shop towels to the top of each cylinder to act as a dam during bleeding. I also learned that covering the top of each cylinder during bleeding prevented oil from spraying all over the garage. It took about 2.5gal, probably more than a standard install due to the extended hose on one side. After bleeding twice and a few cycles up & down it lifted evenly with no load.
I put my smallest/lightest/cheapest car on first, lifted past the first stop, then back down on the safety stops with hydraulic pressure relieved for for few minutes. Back down after that and re-torque the fasteners. A full height lift after that was no problem and torque check back on the ground was good.
I was able to get it to full height in my residential garage (using jackshaft opener) with this car and should be able to with the M5 as well. I'll be limited with overhead clearance on the SUVs but think I may still have enough height to drop an engine/subframe if need be.
I ordered an extra set of anchors to optionally bolt the posts closer and will likely return them. The arms are minimally extended lifting the midsize E90 and my other cars are E60, E70, and E83. Once I decide on extra anchors or not I'll use more epoxy floor paint on the new concrete pads.

Thanks! Garage is 18ft wide but has a lot of stuff (cabinets, tools, machinery) on each side.Looks great! How wide is your garage? Fitment looks great but I worry these pics are deceiving and likely my garage is just too small for this setup
Wow, thats narrower than I'd expected. Mine is 17' so maybe there is some hope. Unfortunately, mine is also only 19' deep so like you I've got a ton of stuff on the sides since there's no room front to back for that stuff.Thanks! Garage is 18ft wide but has a lot of stuff (cabinets, tools, machinery) on each side.
Do you plan to leave it setup most of the time or will you move the posts out of the way and only reinstall when being used? Seems like a hassle to uninstall/install all the time but maybe it's easier than I'm imagining? If I were to get one I think I could keep one post installed all the time but feel like the other one would be too much in the way.
 www.garagejournal.com
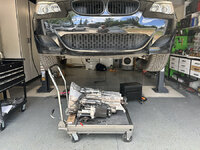
that adj table would be a good addition for that lift, could also double as an adjustable work table.Turns out the 1K HF hydraulic lift table is a great transmission jack for the MaxJax. I modified it to make the handle fold backwards. Would be nice if it went a bit higher, but I lowered the lift to drop a very heavy exhaust then transmission. Next time I pull an engine/trans I'll unbolt subframe and lift car above it.
Had a seal blow on an older rod style lock Dannmar MaxJax Hydraulic cylinder. Any idea if the replacements on the MaxJax site are the same as the older style one? Got quoted $240 per cylinder to rebuild.
 the spackle knife was for scraping the floors, I bought a brand new finishing trowel, who woulda thought that it would take practice to master concrete finishing but I’ll tell ya what, the mud mixer was sweet.


I ordered 8” red heads, but I’m debating on going with the supplied wedge anchors. I’m already herniated, I don’t feel like dealing with picking them up and over the red heads if I need to move it for some reason lol.Looks badass man, which anchors are you going to use?
I’m not exactly opposed to epoxy but it’s not solving any existing problems honestly, that’s essentially what the supplied anchors are but mechanical.What about using an epoxy anchor that you can screw the bolt into rather than have a stud sticking up?
The installers used HDPE shims instead of metal ones on mine (full size 2 post) and one of the posts is actually sitting on a 3/8" x 19" x 18" HDPE 'plate' since the floor was lower on one side compared to the other. I was somewhat skeptical at at first but this material doesn't compress at all and works well. They told me they use this stuff under truck & bus lifts they install all the time.I wouldn't use the metal shims that came with the kit. I couldn't get mine leveled properly with that kit. Instead I got a kit with very dense polyurethane shims that came in various thicknesses. This let me fine tune the shimming under the columns without having to stack multiple shims in one spot. My floor was strangely uneven and using only the metal shims I felt really unsafe by the time I got the columns level.
I’m not really in any type of bind, just waiting for the Crete to cure. You asked what anchors I was gonna use, I had considered 8” long 7/8 red heads (because I my self and partially skeptical of the supplied anchors and short bolts.) the problem with red heads is that I would have the pick the lift up and over the anchor bolts which doesn’t seem worth it to me. My thought what that I could use the red heads and if the studs ever get in the way I can just push the red head down through the footing and use a different type of anchor in its place.Sorry, I think I missed what the problem is. What is the problem you are trying to solve? Some quick comments though.
If you weld the shims to the bottom of the base plate and you ever want to move the posts narrower or wider, you will probably have to grind the shims off because a different shim stackup will probably be needed in a different position.
If you don't want to worry about lifting the column over studs sticking up from the ground, bolting down seems the obvious solution to that problem.
I wouldn't use the metal shims that came with the kit. I couldn't get mine leveled properly with that kit. Instead I got a kit with very dense polyurethane shims that came in various thicknesses. This let me fine tune the shimming under the columns without having to stack multiple shims in one spot. My floor was strangely uneven and using only the metal shims I felt really unsafe by the time I got the columns level.
I also didn't use the bolts that came with the kit except to set the mechanical anchors. They weren't long enough and didn't get enough thread engagement to where I felt comfortable trusting my life to the lift. I ended up getting the next longer size bolt that gave me the proper amount of thread count to make me feel like I wasn't going to die randomly at some point while under the car.
If you drill all the way through to the dirt and push the stud anchors into the dirt after setting them, I don't think you will have enough structure left in the concrete to use them safely again. I'm not a mason or anything but the anchors expand and hammering them out probably means you will be taking the seating surface along with the anchor when they drop down. Even if you pulled them back up and in place, I'd be worried about the cement cracking and failing over time. Though I suppose if you torque the nut to spec, it should hold? I don't know enough about concrete but that would leave me worried about it at night.
I personally did not like the mechanical anchors I got with the kit and decided when I do this again, I would use the epoxy anchors. I'll be setting my maxjax up again in my new house, hopefully in the next few months.
Hope that is helpful.
. 
Hilti is my typical go to. The female type anchored is definitely preferred, I was just on the fence with what to use at the time.Didn't the Maxjax come with Wej-It PD58 Drop in anchors at some point? Did they switch to no-name chinese anchors now? Why not get a box of the actual Wej-it anchors and see how that goes.
If you want to go with threaded stud anchors take a look at the Wej-it ANKR-Tite or the Hilti Kwik-bolt TZ2 series. Both are mechanical and not chemical.