To avoid these ads, REGISTER NOW!

rust removal

Cruzan80

Well-known member
Joined
Jul 22, 2015
Messages
4,155
Location
Denver, CO
The Evaporust works much better when knocking the big crud of rust off item first that would take a long time in evaporust to dissolve; also degreasing the items as much a possible before evaporust as the grease will become a stop barrier for the evaporust to get through.

I am guessing this is a typo, and you meant "The 3M brush works better..."?


Sent from my IN2015 using The Garage Journal mobile app
 
To avoid these ads, REGISTER NOW!

RTM

Well-known member
Joined
May 13, 2019
Messages
13,060
Location
SF Bay Area
I have these lying around if you still need them
-Don

Thanks, but I found a set of machined ones for a reasonable price, hope they work. Thanks for thinking of me.

The radial brush was also ordered, so by ne t week may be functional. Dremel bits are next.
 

macgee

Well-known member
Joined
Jan 11, 2014
Messages
2,834
Location
Sepulveda Pass, CA
Cruzan80,

Nope, not a typo. Thin .008" wire wheel for the bad crud, grime, layers of paint, hard glue and super thick hard rust. Using a bristle brush on it will take forever and will load up the wheel effecting its performance. The 220 wheel can do a lot as seen in the photo's above but is more for finishing. I'm talking about the really bad, sticky and hard stuff that's raised well above the metal surface. It's not often but I do use it when needed.

Getting rid of all that will make your evaporust perform better, will need less time to do its job and last longer.

In the last two days, I've been doing a bunch of evaporust (fresh) and ultrasonic cleaner baths and have not yet had any flash rusting (so far).
 

ccogg

Member
Joined
Nov 5, 2015
Messages
15
I picked these up yesterday from my father in law. Any suggestions for how to treat them? My goal is just to have them usable and protect from further damage. I’ve never used evaporust and I do have access to an ultrasonic parts cleaner. however, if I can get by with a little hand cleaning and oil that would be ideal. Those 3M wheels look sweet, but I’m really worried about doing more damage. Thanks!
f19b0d19541ea4157cd31df861e45ec2.jpg

6289d215b51703f157d8f2782aa71597.jpg


3fb6ac3d39b6d166d97f8922b8c4869d.jpg

eccbbe0304f78ade373c7a105d911fee.jpg


Sent from my iPhone using Tapatalk
 

Attachments

  • f19b0d19541ea4157cd31df861e45ec2.jpg
    f19b0d19541ea4157cd31df861e45ec2.jpg
    182.3 KB · Views: 3
  • eccbbe0304f78ade373c7a105d911fee.jpg
    eccbbe0304f78ade373c7a105d911fee.jpg
    181.6 KB · Views: 6
  • 6289d215b51703f157d8f2782aa71597.jpg
    6289d215b51703f157d8f2782aa71597.jpg
    95.3 KB · Views: 2
  • 3fb6ac3d39b6d166d97f8922b8c4869d.jpg
    3fb6ac3d39b6d166d97f8922b8c4869d.jpg
    197.8 KB · Views: 4

Cruzan80

Well-known member
Joined
Jul 22, 2015
Messages
4,155
Location
Denver, CO
The ultrasonic cleaner may help to get all the bits cleaned, and junk out of the screws. Since I got mine, I have it loaded with Simple Green 1:1, and it has done amazing things with it. Heat it up to 45-50deg C, run for 15-20min.

Sent from my IN2015 using The Garage Journal mobile app
 

Toold_up

Well-known member
Joined
Feb 9, 2019
Messages
639
Location
Attached
I wouldn't trust those micrometers after cleaning them. The precision surfaces are no longer precise. Also the screw to adjust will no longer be accurate, and the barrels/ratchets are most likely no longer have consistent feel or repeatable.
 

ccogg

Member
Joined
Nov 5, 2015
Messages
15
I wouldn't trust those micrometers after cleaning them. The precision surfaces are no longer precise. Also the screw to adjust will no longer be accurate, and the barrels/ratchets are most likely no longer have consistent feel or repeatable.


Good to know. There is an old lathe that will eventually come with these. I’ll have to see how well I can get it setup, and learn to run it, then I can get a new set...


Sent from my iPhone using Tapatalk
 

Cruzan80

Well-known member
Joined
Jul 22, 2015
Messages
4,155
Location
Denver, CO
It depends on how much of that is dirt/grime vs rust. And what kind of tolerances you are trying to keep.
I wouldn't trust those micrometers after cleaning them. The precision surfaces are no longer precise. Also the screw to adjust will no longer be accurate, and the barrels/ratchets are most likely no longer have consistent feel or repeatable.

Sent from my IN2015 using The Garage Journal mobile app
 

Provincial

Well-known member
Joined
Sep 21, 2011
Messages
6,855
Location
Near Salem, OR
Can you turn the thimbles of the micrometers? If they turn, the threads are probably good. If they don't turn, it is likely that the spindle is stuck (from rust or hardened oil) in the frame where it passes through. If this is the case, soak them in penetrating oil like Kroil or Liquid Wrench and see if they free up.

I found an old Starrett 0-1 mike that was stuck. It had rust on the spindle and the thimble would not turn. I removed the thimble and loosened the tension nut, which was now exposed. I soaked the threads and also where the spindle passed through the frame with Kroil for a few days, then reassembled and cushioned the thimble with soft sheet aluminum and clamped the aluminum to the thimble with vise grips. By carefully applying pressure, I was able to get the spindle to turn. I polished the rust off with maroon Scotch Brite pad wet with Kroil. After I got the rust knocked down, I was able to unscrew the spindle and do a proper job of saving what finish I could.

When I was ready to reassemble the mic, I was able to use a Starrett spanner wrench to turn the sleeve (where the scale is etched) and make sure it could be adjusted. I reassembled the mic and got the thimble very close to zero when the contact faces touched. I did the final adjustment by turning the sleeve to zero, then checked the one inch indication with a standard. It was right on! I compared it to in-between settings against a known-accurate micrometer, and it was right on every time!

If there is some rust pitting on the contact faces it may not be the end of the world. If there is enough undamaged surface, the pits won't keep you from getting an accurate measurement if the area being measured contacts enough of the contact faces.

Modern machinists work in ten-thousands of an inch, or even less. In the home shop, everyday work doesn't need to be that precise. Be patient and try to salvage the family jewels. You will get a warm feeling each time you use them, remembering who passed them on to you.

Here is a link that shows the names of the parts of a micrometer:
https://image.slidesharecdn.com/micrometerr-150308132242-conversion-gate01/95/micrometer-2-638.jpg?cb=1425821146
 

Attachments

  • Starrett Mic.comp.jpg
    Starrett Mic.comp.jpg
    29.2 KB · Views: 61
  • Starrett Mic. Work.comp.jpg
    Starrett Mic. Work.comp.jpg
    30.8 KB · Views: 66
Last edited:

macgee

Well-known member
Joined
Jan 11, 2014
Messages
2,834
Location
Sepulveda Pass, CA
Hold off on turning any of the micrometers please. I have had to rebuild/restore a lot of these and some very recently acquired from a fellow GJ member.

Provincial provided some good info.

Even without rust or even dust on them, most old micrometers that have been sitting for a long time have seized inside by the hardened grease that turns into a hard glue or worse. Any force more than just using your hand softly (no tools) turning can ruin the micrometer threads by stretching the fine threads or by bending the outside thumb dial which happens when applying load trying to turn it. Even trying to turn the micrometer without tools can really harm it. The threads per inch is really fine and very susceptible to damage.

Like what Provincial said, Use a good penetrant like sea foam deep penetrant to help get inside and loosen things up and let them sit for a long time before turning. After letting them sit for a week or month in sea foam, Putting them in the oven to heat up around 150 degrees max will also help soften it up. Then turn, also rubbing alcohol fed into the gaps also helps.

The two bottom micrometers have ratcheting thimbles that will also need to be cleaned out/serviced.

I know this sounds like a lot of work but cowboying it generally doesn't end well, I know the hard way. I was surprised which ones I was able to salvage, although a lot don't make it.

Whether these will be useful micrometers or not will also depend on both anvils and if they have any corrosion pitting on them and if any of the threads have stretched. Lastly, if you use Evaporust there's a really good chance you'll remove the black markings as they're black oxide making it hard to read or you'll need to re-paint them.

Shiftless is correct, having gage standards will tell if they're still accurate or not after all that work restoring them. Its pretty random which ones can be useful or wall art and you may have a lot of new wall art. I've been able to save ones that are still accurate/repeatable to .0001" and others all over the place no matter what you do, sometimes measuring ok in certain spots which is no good and trash. Some of the ones below came out well but the small one in photo is wall art due to the grease turning into a acidic corrosive type rust inside the threads destroying them in a certain spot when I tried servicing it which is a bummer as the anvils were made with very good carbide and looked new.

Provincial is also correct, having the correct spanner wrench is very important to bring them back to zero.

Good luck with them.

51070356851_abafcf30e9_b.jpg


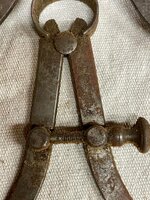
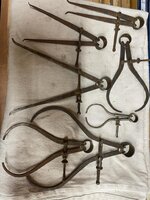
The hand compass's/calipers should come out fine with evaporust and with the radial bristle brush wheel. two days ago I cleaned up this Starrett caliper that looked like yours. They're easy to take apart to make it much easier to clean all the areas. You have a nice set of them.

51069691928_8ce06f0149_b.jpg
 
Last edited:

RTM

Well-known member
Joined
May 13, 2019
Messages
13,060
Location
SF Bay Area
OK, I am finally ready to start playing with the big kids. I have a 1/4 HP 1725 motor, some machined washers, and a 6" radial bristle wheel. Kinda fun to watch the wheel deflect and return under the pressure of the tool. Now to find a better way to mount the motor, only gravity at work for the moment. Thanks macgee et al for the guidance, or push, depending on how you look at it.

Dremel bits were ordered after the test spin with this set up.

Going to look for a threaded arbor for the 1/3 HP motor, and look for a fine wire wheel for him next.


IMG_20210330_145738-X2.jpg
 

ray h

Active member
Joined
Nov 20, 2020
Messages
36
Location
back of house
macgee, I received my wheels the other day. I played a little today with the 80,220 and 400 grit. I was getting a blue dust off the 400. Is this to be expected? I didn't see any dust coming off the 80 and 220 wheels. I noticed you cleaned the knurling on some tools. Do you use a chemical clean first on the knurling? The little I played today I was very impressed, these wheels should be a must have. It'll be a couple weeks till I get back in my little shop.
 

macgee

Well-known member
Joined
Jan 11, 2014
Messages
2,834
Location
Sepulveda Pass, CA
Hey Ray,

Sorry, I've been out of touch with this thread and thought it would be good to give a chance to hear from others as well. Nice to hear from other GJ members liking their radial wheels.

Glad to hear you got the radial wheels. Is the blue dust to be expected? Yes & No
The blue dust came from when you put a sharp edge object into the path of the wheel when running, the wheels substrate is a soft rubbery material that can get shaved, create dust when hitting a sharp edge. Sharp threads, key slots, sharp crisp hard steel non de-burred edges can do this. I recently milled up a metal steel block for a jig I'm making and did the same same thing as you, the edges were 90 degree but sharp and made red dust. It's not a big deal, it's only dust amounts you're taking off but be mindful of it and try to wheel sharp edges gently and not square on.
This will also happen more in the beginning while breaking them in when they're stiffer.

Just be aware, I recently swapped out my main wheel for a new one and boy was there ever a difference in finish from the old broken in one, it was much rougher and I missed my broken in one but its getting there and will soon give the same finish. I also doubled the width of the wheel and regretted it, I like the orig. width, it made more sense and much more useful being a little thinner. Also make sure your wheel is balanced on your spindle, this will really improve the finish of the item and run much smoother.

I have rebuilt and de-rusted the six rusted Jacobs Super ball bearing chucks (seen in the bucket full of chucks in a pic I posted earlier in this thread, post #200) and very happy with the results. After receiving some new arbors and mounted to the chucks I was getting .0015" TIR and better total runout out measurements taken 1" below the jaws. On one 16N, I was getting .0006" max runout measured in several postions on three different diameter test pins (.040", .3", .50"), the 8-1/2N was .0007". I think it makes for a very good case and reason not to chuck out (pun intended) a rusty looking item and instead save some good old machinery and tooling.

Max .0005" TIR showing on indicator.
51103635421_bdd6b97967_h.jpg

51070215882_14c2eecbb9_h.jpg
51069415453_9bcf77d48c_b.jpg51103757479_f4a6cb0b48_z.jpg

Before Ultrasonic cleaner and Evaporust
51063349141_e640089292_h.jpg
 
Last edited:

ray h

Active member
Joined
Nov 20, 2020
Messages
36
Location
back of house
macgee-- thanks for the help. I tried changing the angle of attack and it did reduce the dust. I got a ultrasonic cleaner but haven't taken it out of the box. When I get back in town I'll get some EvapoRust. I did get a gal of Simple Green Aircraft stuff from Zoro. I need to experiment. Looking at the insides of your cleaned chucks was impressive as the finish on the outside. Thanks
 

drivesitfar

Well-known member
Joined
Oct 23, 2013
Messages
35,991
Location
Pacific Northwest
Mac: great job on the chucks. i like your measuring and labeling too and are you planning on keeping them for yourself or passing them on so you can use the funds to buy more rusty gold?

so how many wheels at a time do you suggest on each end of your grinder? sounds like you like just one, but i've seen others with several?
 
To avoid these ads, REGISTER NOW!

Hooterville

Well-known member
Joined
Apr 9, 2021
Messages
78
Location
Northern California
I have never used electrolysis but I am considering electrolysis for a cast iron stand. I found a youtube video for electrolysis in a low concentration of acetic acid (white vinegar) ....see youtube video from Ken Sweden "True rust removal by a chemist - boosting the performance of white vinegar by electrolysis"
 

lis2323

Well-known member
Joined
Dec 25, 2016
Messages
3,234
@macgee I am thoroughly impressed with those chucks. Talk about picture perfect![emoji481]


Sent from my iPad using Tapatalk
 

macgee

Well-known member
Joined
Jan 11, 2014
Messages
2,834
Location
Sepulveda Pass, CA
Mac: great job on the chucks. i like your measuring and labeling too and are you planning on keeping them for yourself or passing them on so you can use the funds to buy more rusty gold?

so how many wheels at a time do you suggest on each end of your grinder? sounds like you like just one, but i've seen others with several?

@macgee I am thoroughly impressed with those chucks. Talk about picture perfect![emoji481]


Thanks guys,


Drives: There's 12 super chucks in total that I just restored in a batch; so yes, they'll be offered to new homes to help fund the tool acquiring which I have been doing a lot lately. A couple have already went to other GJ members (thank you to them).

To your question: The orig amount of layers that come in a stock 3M Radial Brush wheel is 7 layers and I now see why they picked that width, it seems perfect; at least for the way I use it. For now on I'm sticking to 7 like the way it comes.


lis2323: I couldn't resist posting that pic and do a little bragging as I'm pretty happy about it. You never know what your going to get after it's all said and done. Getting .0006" runout in multiple positions is as good as it gets especially on a 5/8" cap. chuck that can also hold that tolerance with .040" dia bit; rebuilt chucks typically are around .005" on a good day. When these Super ball bearing chucks are running smooth, they're almost keyless chuck, for sure in small dia bits.

```````````````````````````````````````````

So today (Sun.) I went picking early this morning and was given this doozy and will be my little test project on rust removal. It's already been in the Ultrasonic cleaner this afternoon and currently in the Evaporust bath having a well needed soak.

*** I believe its an "end mill grinding fixture"??? Anyone know what it is ???
It's a bit sad as I can tell this was really well made and the surface plate was grounded to 9th degree to the same degree of a sine plate would have. We'll see how it turns out.

51110556411_b39c60d36d_b.jpg

51111334640_bd181f6ee1_b.jpg
 
Last edited:

macgee

Well-known member
Joined
Jan 11, 2014
Messages
2,834
Location
Sepulveda Pass, CA
Here you go,

Luckily it worked out ok and did not take too long, all done this afternoon.

Totally dissembled, then Ultrasonic cleaner in a hot 50C temp degreaser, rubbing alcohol rinse and some copper wire brush to take off any thick rust crud off and then into the Evaporust bath while still very hot for three hours, rubbing alcohol rinsed and patted dry, then radial brush wheel 220 & 400. After that's all done, I did lap the important surfaces to see where there at and if there's any damage and then finished lapping at 600 grit for top and bottom of plate, the top of collet and base of the cylinder.

There was some bad pitting but pretty much the important bits came out ok, the lapping really helped. Tomorrow I'll work on it a little and see if I can make it any better. It's interesting, the top of the base plate has about a 2 degree slope angle milled into it.
Figured it out, its a PHASE II Indexable End Mill Sharpening Fixture.


51110606714_fd11a30887_k.jpg

51110608169_268b9f6e48_k.jpg


51110289207_690d70a430_b.jpg
51111633790_2fd64f8385_b.jpg
 
Last edited:

drivesitfar

Well-known member
Joined
Oct 23, 2013
Messages
35,991
Location
Pacific Northwest
Mac: if you have a minute can you post up a few pictures of your grinder with the 7 layers of radial brushes attached so I (we) can see what you are using?

WOW talking about RUSTY GOLD cause you did another great job.
 

lis2323

Well-known member
Joined
Dec 25, 2016
Messages
3,234
To your question: The orig amount of layers that come in a stock 3M Radial Brush wheel is 7 layers and I now see why they picked that width, it seems perfect; at least for the way I use it. For now on I'm sticking to 7 like the way it comes.


Thanks for the insight. I will definitely keep that in mind. I guess the old “bigger/more is better” mantra falls by the wayside once again. [emoji1]


Sent from my iPad using Tapatalk
 

Jayman17

Well-known member
Joined
Feb 6, 2017
Messages
3,793
Location
Seattle, Wa
Macgee, are you happy with your choice of ultrasonic cleaners? What brand and size did you get? I am looking at maybe getting one, they all look like they come from overseas, any tips on choosing one?

Jay
 

macgee

Well-known member
Joined
Jan 11, 2014
Messages
2,834
Location
Sepulveda Pass, CA
Thanks guys,

It came out pretty well. The hot temp in Ultrasonic cleaner (USC) is the secret and then transferring it into the Evaporust bath when still warm, it really speeds things up and makes it stronger. I also using rubbing alcohol much more to clean item when they come out of each bath to not containment the baths or wheels and rub off any grime still on it. Having two USC's would be awesome, one full of degreaser and one with Evaporust; that would be a pretty Gucci setup.


Shiftless is correct and totally made the mistake quoting 7, he's right it's eight layers new out of the box.

Pic of the 220 grit version
51112271666_c661640684_b.jpg

Drives, I'll post a pic of set up when I have time. I actually found an old 1750 rpm Craftsman dual spindle 1/2hp motor and mounting it on an old pedestal I have laying around that I'm setting up for 220 & 400 wheels. I can also confirm that I much the slower speed. Because of the slower speed there's less centrifugal force, making the wheel more pliable and leaving a cleaner pattern on the metal.

Jay,

I actually found my 6L USC in my local craigslist, it was still in the box, new and the price was half of what you find on Amazon so I took the risk and has been working great. It's is the one of those you find on Amazon but with larger wattage heater (important) and after using it so far I would gladly spend the price they're asking on Amaz; I just got lucky finding one locally. They're are US and German made ones that watchmakers and computers repairman use, they're excellent with some nice features but they can easily cost up to 10x's more than one of these. I would love one but budget prevailed and mine is working fine so far.

Mine is essentially this one or very similar and so far I have no issues with mine.

https://www.amazon.com/gp/product/B07ZNR7J48/ref=as_li_tl?ie=UTF8&camp=1789&creative=390957&creativeASIN=B07ZNR7J48&linkCode=as2&tag=atomicindus08-20


I paint filled the numbered engravings
51112278341_35560e73f5_b.jpg
 
Last edited:

JoCoSawdust

Well-known member
Joined
Nov 19, 2018
Messages
2,416
Location
Eastern NC
Another convert to the 3M radial brush here. Thanks for the tip!

I picked up a barnacle of a '47 bench model DP this past Sunday. I knew I could save it all but was concerned about bringing the column back to life. It was the worst I've picked up. I used Metal Rescue gel first then took it to the radial brush. I've still got work to do to it but, considering what I started with, this is looking good! It's also nice not donating blood when my hand errantly touches the wheel.

attachment.php
 

Attachments

  • IMG_0470.jpg
    IMG_0470.jpg
    122 KB · Views: 267

drivesitfar

Well-known member
Joined
Oct 23, 2013
Messages
35,991
Location
Pacific Northwest
Mac and Shift: thanks for posting pics cause now I know you are talking about one wheel that has 8 rows on it. I was thinking Mac was putting more than one of these on each end of his grinder sort of like we do with some wire wheels. i thought 7 was excessive hence me asking for a pic.

what method did you use to put the black paint in the numbers?

ALL: so does this radial brush on a grinder work on all cast iron or just steel cause I really like that shine you guys get with these?
 

macgee

Well-known member
Joined
Jan 11, 2014
Messages
2,834
Location
Sepulveda Pass, CA
JoCoSawdust:

Nice job, those DP columns can give you a work out. I've used Naval Jelly with good really success on them but hate working with the stuff but does an awesome job on rust. be careful with too much wheeling on the column, even a couple of thousands off effects the table clamping well.
Be sure to post some pics when its cleaned up.


Drives: I used Lacquer-Stik in black color to fill in the numbers:

https://www.amazon.com/Markal-Lacquer-Stik-Paintstick-White/dp/B002BY8HKS/ref=sr_1_1?dchild=1&keywords=Lacquer-Stik&qid=1618287178&sr=8-1

Another example of Laquer Stik that I did:
50923954552_81a52d5abb_b.jpg


Works great on cast-iron:
51112624959_a31256668e_h.jpg
 
Last edited:

RTM

Well-known member
Joined
May 13, 2019
Messages
13,060
Location
SF Bay Area
Drives: I used Lacquer-Stik in black color to fill in the numbers:

https://www.amazon.com/Markal-Lacquer-Stik-Paintstick-White/dp/B002BY8HKS/ref=sr_1_1?dchild=1&keywords=Lacquer-Stik&qid=1618287178&sr=8-1

Another example of Laquer Stik that I did:
50923954552_81a52d5abb_b.jpg


How are you applying the lacquer stik ? I’ve tried cold, which was a miserable failure.
Heating with the heat gun, or placing under a 500w halogen lamp, applying, then letting it cool, and then wiping, and still lose most of it. I really want to spruce up a few Starrett rules and things that have very low contrast.

Thanks
 
Last edited:

JoCoSawdust

Well-known member
Joined
Nov 19, 2018
Messages
2,416
Location
Eastern NC
JoCoSawdust:

Nice job, those DP columns can give you a work out. I've used Naval Jelly with good really success on them but hate working with the stuff but does an awesome job on rust. be careful with too much wheeling on the column, even a couple of thousands off effects the table clamping well.
Be sure to post some pics when its cleaned up

Thanks. I love drill presses but absolutely hate working on columns. I always have a thread from another forum in the back of my mind. Guy worked a column on a lathe. Ended up with a mirror-finish tube of steel that he couldn't clamp anything to.

You've posted some amazing saves on this thread, hence my decision to try out the 3M wheel. Ordering a blue wheel tomorrow since I can't find any bargain deals on one. I'm sold on the radial brushes.
 
To avoid these ads, REGISTER NOW!
Top Bottom