Old tool guy
Well-known member
- Joined
- Apr 13, 2023
- Messages
- 3,258

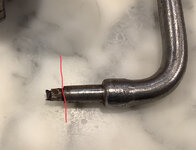
Thanks for the pictures. Another option for you is to cut the broken part off just above the shoulder. Then put a tight-fitting washer on it and peen the end over. If you had access to a welder you could also weld the washer on. Of course these options are basically permanent where a nut or screw would allow future removal.LH thread? Great. Here are a couple more pics, I might take you up on that offer. The shank is about 3/8” dia x 7/8” long.


 1/2 inch, grind it down to original and then take a hack saw and cut a cross to mushroom out with your main screw.
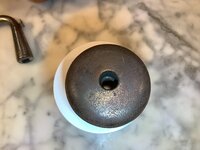
Is it the design that says. H.O. White No 2 Brace? Or is there some indication of marks that says H.O. White? Tell me more.I know folks here are reluctant to give advice, like “what I would do is …” but I’m going to ask anyway. I have this H. O. White No 2 brace (probably 1830-1850) that has a top cap problem. Here is a picture from the Sydnas Sloot site that suggests what the cap may have looked like.
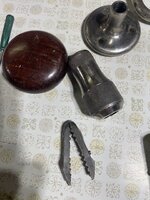
I’m guessing the large screw was lost and a previous owner split the top if the shaft and mashed it over like a cotter pin, spreading the tails. When i bent the tails back together, they broke off. So what I’m thinking is to cut off the broken part of the small dia shaft, drill and tap it, and use some kind of screw to hold the cap in place. I don’t have a lathe so i will have to do with whatever the hardware store has. Not trying to get it back to factory condition, but i do need to secure the cap in place.
No. You need a washer to fit over it so the shoulder should be slightly taller than the washer thickness.Cut here and peen?
Yes, mine is threaded. Just a drop of epoxy would hold it securely. Good metal epoxy.Mike ... tell me more. Is the inside of the cap threaded for that plug? Mine is not. And i’m not understanding how you made the plug.
Try sanding the washer down until it's flat on both sides. Then countersink on side and position it at the top. Then when you peen the material has a place to go and is more likely to secure the washer. That should work for you.It has this washer … that might be slightly too thick. Although if i start peening it might push it down and be just right.
You might conder these: https://www.mcmaster.com/products/hole-covers/protective-plugs~/metal-snap-in-panel-plugs-8/Yes, mine is threaded. Just a drop of epoxy would hold it securely. Good metal epoxy.
Where did you find the information on H.O. White?I know folks here are reluctant to give advice, like “what I would do is …” but I’m going to ask anyway. I have this H. O. White No 2 brace (probably 1830-1850) that has a top cap problem. Here is a picture from the Sydnas Sloot site that suggests what the cap may have looked like.
I’m guessing the large screw was lost and a previous owner split the top if the shaft and mashed it over like a cotter pin, spreading the tails. When i bent the tails back together, they broke off. So what I’m thinking is to cut off the broken part of the small dia shaft, drill and tap it, and use some kind of screw to hold the cap in place. I don’t have a lathe so i will have to do with whatever the hardware store has. Not trying to get it back to factory condition, but i do need to secure the cap in place.
Sorry … those are **** ugly for a vintage brace. Good idea on thinning the washerYou might conder these: https://www.mcmaster.com/products/hole-covers/protective-plugs~/metal-snap-in-panel-plugs-8/
They are not flush.
Here. http://www.sydnassloot.com/brace.htmWhere did you find the information on H.O. White?
Thanks, but i’m not clear on what you used for the plug.Yes, mine is threaded. Just a drop of epoxy would hold it securely. Good metal epoxy.
Sandy Moss has excellent information. Not sure what will happen to it as he died September 2024. Not sure about the tools he had for sale either. Probably will be sold on consignment by one of the larger dealers. He will be missed. R.I.P.Here. http://www.sydnassloot.com/brace.htm
Click the “braces collection” and start reading. H O White is part of “Taylor Patent”.
I believe he was saying to use a welder to rebuild the shaft to something larger in diameter and then grinding it down and making the shaft longer. After grinding it down, put the washer on and cut the shaft so it is longer. Then cut a cross into the top of the shaft to make peening easier. This of course assumes you have a welder, or access to one.This is what you said in #164 … doesn’t make sense.
1/2 inch, grind it down to original and then take a hack saw and cut a cross to mushroom out with your main screw.
Yea. My thread gauge says 18 x 5/8. Now my brace is a model 1 1/2 if that makes a difference.Mike ... what thread is the plug in the end of the cap? I cleaned mine out better and discovered that it is threaded. Best i can tell, it’s something like 5/8-18 but that’s some guessing. I don't have a tap bigger than 1/2” and it’s real hard to read how the teeth in my thread gauge fit. I think i will take it to the local Ace hardware and try some bolts.


Just did a large update. 180 pages so far. More to do.Heres a link to the latest update. Click on the "Eric Brown's Augermaker list". Still have a lot to put in.


Hargrave catalogs may be found in the ITCLAnother one I didn't know. Just found it. Hargrave.

Working on the auger list and have a few I have not been able to identify, yet. Anybody know?
First is a counter bore, no markings. Makes a flat bottomed hole. Adjustable from 1 1/2" to 2 1/8", 1/4" pilot. The bolt holding it all together is a 5/16-16. (No not a typo, 16 threads per inch). Everything about it tells me it's old and was manufactured.
 In order to aid in your quest, here are the some of the starter patents for expansive bits. It provides no definitive resolution, but whoever patent your’s there, would have likely sited one of them.
  cool piece!
I had these prints done by Briony Morrow-Cribbs. Limited edition. She still has some for sale if interested.
Sourced from reference; lostartpress
 Well,..We all share them, I reckon. Appreciate the reference! I’ll check that out!
Good job. Be sure to oil it to keep it from rusting. (I use Metal Elixer from Union Manufacturing Co. for surface metals).I spent many hours with my Dad in his workshop as he was always working on something. As a woman in my mid 50’s, I’m grateful he included me in his projects.
Unfortunately, he passed away in May at 87. I am trying to organize and restore the tools as I find them. Because of this forum, I am learning so much. I’ve totally fell into the rabbit hole.
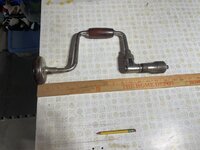
Today, I restored the Lakeside brace I learned to use as a kid.

 www.unionmfgco.com
Thank you. I used some 3n1 oil on this tool.Good job. Be sure to oil it to keep it from rusting. (I use Metal Elixer from Union Manufacturing Co. for surface metals).
Union Metal Elixir ™ Rust Preventative — Union Manufacturing Company
Lasting rust protection for your treasured tools. Developed and manufactured in house using a proprietary blend of ingredients that were developed by Union’s chemist. Our Union Metal Elixir ™ penetrates metal and dries. leaving your tools protected but not oily or greasy. Specifically developed fo
Great job!I spent many hours with my Dad in his workshop as he was always working on something. As a woman in my mid 50’s, I’m grateful he included me in his projects.
Unfortunately, he passed away in May at 87. I am trying to organize and restore the tools as I find them. Because of this forum, I am learning so much. I’ve totally fell into the rabbit hole.
Today, I restored the Lakeside brace I learned to use as a kid.

 she is read to stand the test of time! Positive ya Father is up there smiling!


 -Don
-Don
Thanks. You are right, the #14 does need a little bit more polishing. The #10 is a replacement but is from the same maker and same cutters.The flutes on the #14 aren’t polished as well as the others.
Just kidding … awesome job. Did you have all the bits, or did you have to find replacements?