Richard D
Well-known member
O.K, so I'm on page 16 so far and 22 pages to go! I plan to cut my floor, pour 5000psi concrete/rebar, & embed a steel plate to mount my Maxjax. Has anyone else done that?


I will check this when I get my lift.If you used the cheap and 'incorrectly wrapped from the factory' tape provided with the lift, then that is the problem.
I had to re-wrap all of the fittings with a better quality tape, and haven't had a single drop leak.
The reservoir on mine leaked from the lower drain plug/cap. If you have a leak from the top cap, you might be over filling the reservoir.
To remedy the lower leak, I raised the lift 3/4 the way up, laid the power cart on it's back, and removed the plug/cap.
The surface that the o ring seats against on the reservoir had what looked like a casting seam and a groove that ran up and down on the surface, there was no way the o ring could get tight enough to fill the void.
A little time with a file, and all is well with it now.
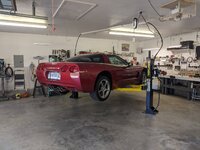
And the Jag is red. Nice!!!!If I were pouring a new slab I'd have ran conduit under the slab and ran the hydraulic line from one side to the other through it. But three months ago we bought a house with an attached 4 car garage and a detached 15'X30' RV garage. I moved the MaxJax from the old house to the new and ran the hydraulic line overhead. It's attached to a bridge I made from 3/4" steel electrical conduit.
The anchor bolts are in the existing slab of 5-1/2" thick concrete reinforced with 1/2" rebar. I also set them in epoxy.
As soon as the new starter arrives I can get the E-type off of the lift and do some oil changes and motor mount replacement on other cars.
I plan to cut my floor, pour 5000psi concrete/rebar, & embed a steel plate to mount my Maxjax. Has anyone else done that?
I just checked the price for a MaxJax....a whopping $3770.
When I bought mine, they were going for less than $2000. What the hell happened to Dannmar's pricing?
Then I went on their site and saw the price and I was like NO WAY. At almost $4k...
-Nigel
 www.garagejournal.com
I saw several comments here about people with the first generation MaxJax thinking about upgrades. Take a look at this if you have not already seen it, might be a consideration for you.
New MaxJax Upgrade for MaxJax V1 Owners
I’m back with what I hope is another helpful post and product for MaxJax users. You may remember my original post here in GarageJournal some 10 years ago when the MaxJax was a very new product. That post went through the entire process from transporting, installation, and use. You can see that...
The model number I was given by the Bendpak folks was MJ6-SW as I posted.
As far as I know, they have been under the same corporate umbrella for as long as I've been using their products.That is news to me. When I bought my MaxJax it was under the Dannmar name. Now it is under the Bendpak name?
When did they get bought out or were they always the same company?


Here are some pictures of my install from prepping the concrete to the finished product.
Cutting of the slab.
Prepping for the pour, I went 12" deep with a 6" undercut on three sides. Also pinned to the existing slab and foundation.
A couple of days after the pour.
Finished product.
I wanted an easier way to grease the lift so I modified the slide blocks to pass grease through them. Now I just use a grease gun to do the job.What is this?! I've never seen anything like that?
-Nigel


Love this super clean install! Nice mod on the grease fittings also!Here are some pictures of my install from prepping the concrete to the finished product.
Cutting of the slab.
Prepping for the pour, I went 12" deep with a 6" undercut on three sides. Also pinned to the existing slab and foundation.
A couple of days after the pour.
Finished product.
")
I'm suspecting I need to make sure both hoses are the same length to ensure they raise at the same speed.
Has anyone else had this issue or ran different length hoses?
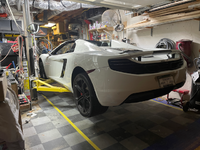
The new toy I've been fixing, Mclaren wants about $15k to fix it, I've done most of it for about $2500
thanks!
www.garagejournal.com
Weird as it comes up for me.thanks Steve! Do you have a link to the value you used, the link in the old thread doesn't work anymore, and do you have a pic of how it was installed, did it just go inline or did you have to use some adaptors/couplers ? That sounds like a perfect solution.
 www.globalindustrial.com

Yes picture above. I edited that post so you may have missed it.thankyou for some reason the forum is using viglink to re-write the URL and I land on that page you provided but its all about their plastic bins
so instead of the link you provided I get this (notice the redirect)
This explains it :
VigLink - Wikipedia
en.m.wikipedia.org
anyway, I found it with the part number you provided, thanks a million this is going to be great! I get so annoyed when its not level and have panic attack when a car isn't level and quickly lower it
Do you have a pic of where you installed it at all?
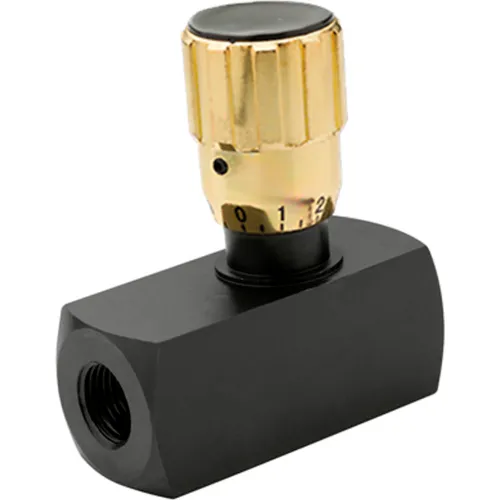
I want to be able to find this in the future in case I need one.Dynamic JP-FC Micrometer Adjustment Knob 3/8-NPT
Dynamic JP-FC Micrometer Adjustment Knob 3/8-NPT. Usually ships in2 days. Buy it and Save at Globalindustrial.com
Search for WBB537232 if the link does not work.
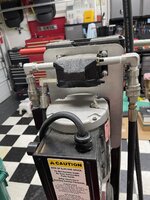
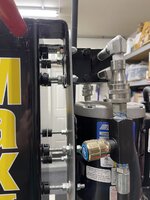
@realien no not really as it was several years ago. Below are a few pictures that show how I mounted it. It hangs from the top so nothing is screwed to the column.@skamp do you have a post or writeup of the parts you used to mount the power unit on your column? I'm going to be moving my lift to a garage I'm building and I think I will column mount it this time (its on the wall right now). You have some nice extensions and 90 degree bends on your power unit I don't have.
Hi Nigel,Very interesting on the flow control. So I'm going to ask dumb questions because I'd rather ask and do it right than assume and then have the car fall on me.
With the flow control above you said to put it on the high side. What does that mean exactly? My pump is mounted on the wall, right next to the closest column. The outside column is the far left hose on the pump (longest hose). I'd install the flow regulator on the outside line (furthest column, like you in your picture?)
And this will enable the uneven-ness lifting that normally happens. IE: My closest column lifts higher than the furthest column. The furthest column is always about an inch lower than the other side. I've bleed numerous times, no air bubbles and have bled with weight on the lift as well.
Thanks much,
-Nigel
@realien I ordered it all from here:I'm going to have top copy your mounting solution @skamp thanks!
Is the extension pipe you used just some galvanized 3/8" like this ?
https://www.homedepot.com/p/Southla...yJu2piUy6J_KX9KhBERoCAwQQAvD_BwE&gclsrc=aw.ds
| Code | Item | Qty | Price | Grand Total |
| 700-06-06S | 700-06-06S | Set of 3/8" Hydraulic Quick Disconnects (Steel) | 2 | $17.90 | $35.80 |
| 5404N-06-2.5 | 5404N-06-2.5 | Seamless ******, 3/8" NPTF x 2.5" Long (Steel) | 1 | $6.35 | $6.35 |
| 5502-06-06 | 5502-06-06 | 90° Street Elbow, 3/8" NPTF Male x 3/8" NPTF Female (Steel) | 2 | $2.55 | $5.10 |
| 5503-06-06 | 5503-06-06 | 45° Street Elbow, 3/8" NPTF Male x 3/8" NPTF Female (Steel) | 2 | $2.66 | $5.32 |
| 5000-06-06 | 5000-06-06 | 3/8" NPTF Female x 3/8" NPTF Female (Steel) | 2 | $0.97 | $1.94 |
| TTA50 | PTFE Thread Sealing Tape (1/2" x 260" roll), TTA50 | 1 | $0.68 | $0.68 |
| 5404N-06-3 | 5404N-06-3 | Seamless ******, 3/8" NPTF x 3" Long (Steel) | 1 | $14.29 | $14.29 |